
Page 11 - 2009 AMA Summer
P. 11
apply pressure to the ligament in one direc- tion only so as not to obstruct blood flow. Use a rhythmical pressure through the fin- gers or thumb across the fibres, not in line with them. This means roughly in the direc- tion of heel to toe, as shown by the 2nd and 3rd photos. The area will soon feel numb, continue for a few more minutes. Do this twice a day.
Stretching & Strengthening
An ankle inversion injury may also suggest your muscles that resist inversion are weak. Also common is that those muscles tighten as a protective measure against re-injury,
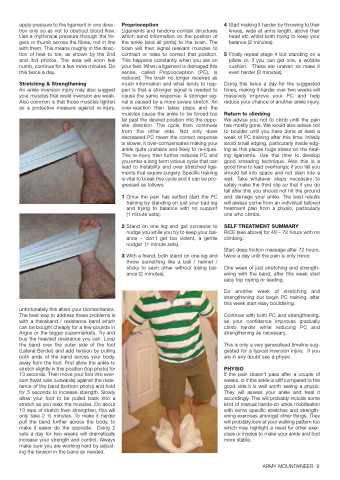
unfortunately this alters your biomechanics. The best way to address these problems is with a theraband / resistance band which can be bought cheaply for a few pounds in Argos or the bigger supermarkets. Try and buy the heaviest resistance you can. Loop the band over the outer side of the foot (Lateral Border) and add tension by pulling both ends of the band across your body, away from the foot. First allow the ankle to stretch slightly in this position (top photo) for 10 seconds. Then move your foot into ever- sion (twist sole outwards) against the resis- tance of the band (bottom photo) and hold for 5 seconds to increase strength. Slowly allow your foot to be pulled back into a stretch as you relax the muscles. Do about 10 reps of stretch then strengthen, this will only take 2 1⁄2 minutes. To make it harder pull the band further across the body, to make it easier do the opposite. Doing 2 sets a day for two weeks will dramatically increase your strength and control. Always make sure you are working hard by adjust- ing the tension in the band as needed.
Proprioception
Ligaments and tendons contain structures which send information on the position of the ankle (and all joints) to the brain. The brain will then signal relevant muscles to contract or relax to correct that position. This happens constantly when you are on your feet. When a ligament is damaged this sense, called Proprioception (PC), is reduced. The brain no longer receives as much information and what tends to hap- pen is that a stronger signal is needed to cause the same response. A stronger sig- nal is caused by a more severe stretch. An over-reaction then takes place and the muscles cause the ankle to be forced too far past the desired position into the oppo- site direction. The cycle then continues from the other side. Not only does decreased PC mean the correct response is slower, it over-compensates making your ankle quite unstable and likely to re-injure. This re-injury then further reduces PC and you enter a long term vicious cycle that can lead to instability and over stretched liga- ments that require surgery. Specific training is vital to break this cycle and it can be pro- gressed as follows:
1 Once the pain has settled start the PC training by standing on just your bad leg and trying to balance with no support (1 minute sets).
2 Stand on one leg and get someone to nudge you while you try to keep your bal- ance – don’t get too violent, a gentle nudge! (1 minute sets).
3 With a friend, both stand on one leg and throw something like a ball / helmet / sticky to each other without losing bal- ance (2 minutes).
4 Start making it harder by throwing to their knees, wide at arms length, above their head etc whilst both trying to keep your balance (2 minutes).
5 Finally repeat stage 4 but standing on a pillow or, if you can get one, a wobble cushion. These are uneven so make it even harder (2 minutes).
Doing this twice a day for the suggested times, making it harder over two weeks will massively improve your PC and help reduce your chance of another ankle injury.
Return to climbing
We advise you not to climb until the pain has mostly gone. We would also advise not to boulder until you have done at least a week of PC training after this time. Initially avoid small edging, particularly inside edg- ing as this places huge stress on the heal- ing ligaments. Use this time to develop good smearing technique. Also this is a good time to lead overhangs; if you fall you should fall into space and not slam into a wall. Take whatever steps necessary to safely make the third clip so that if you do fall after this you should not hit the ground and damage your ankle. The best results will always come from an individual tailored treatment plan from a physio, particularly one who climbs.
SELF TREATMENT SUMMARY
RICE (see above) for 48 – 72 hours with no climbing.
Start deep friction massage after 72 hours, twice a day until the pain is only minor.
One week of just stretching and strength- ening with the band, after this week start easy top roping or leading.
Do another week of stretching and strengthening but begin PC training, after this week start easy bouldering.
Continue with both PC and strengthening, as your confidence improves gradually climb harder while reducing PC and strengthening as necessary.
This is only a very generalised timeline sug- gested for a typical inversion injury. If you are in any doubt see a physio.
PHYSIO
If the pain doesn’t pass after a couple of weeks, or if the ankle is stiff compared to the good side it is well worth seeing a physio. They will assess your ankle and treat it accordingly. This will probably include some kind of manual hands-on ankle mobilisation with some specific stretches and strength- ening exercises amongst other things. They will probably look at your walking pattern too which may highlight a need for other exer- cises or insoles to make your ankle and foot more stable.
ARMY MOUNTAINEER 9
