
Page 10 - Outdoor Practitioner Issue 2
P. 10
• Activity
Making prints with sun print print paper
Introduction
Cyanotype is a a a a a a photographic printing process that uses the sun to to create wonderful cyan-blue prints What you'll need:
• • • a a a a a a a sunny day! • • • water
• • a a a a a a a a a a a a pack of of sun sun print paper
card card or fabric
• • a a a a a a a a a a a a a a piece of of of thick cardboard and some pins
• • a a a a a a a a a selection of of natural materials/objects
• a a a a a a a a a waterproof container the the size of of of the the print paper
Preparation
Choose a a a a a a a a a a a nice sunny day for this activity! Have everything you need to to to hand and and ready to to to go – the process starts to to to happen quickly How does it it work?
The sun-sensitive material is coated with light-sensitive chemicals chemicals When When exposed to to to light light light light the the the the chemicals chemicals react to to to the the the the light light light light waves and particles When When objects
are positioned on
on
on
top they block the the the the the the the the light light light and and the the the the the the the the the effect the the the the the the the the the sun has on
on
on
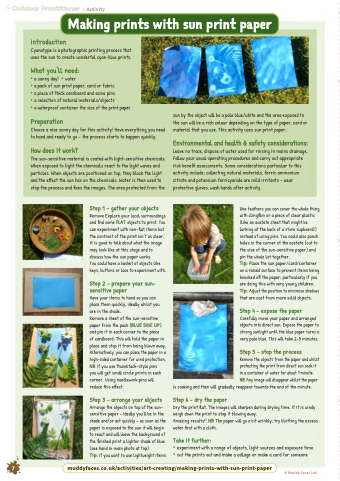
the the the the the the the the the chemicals Water is then used to to to stop the the the the the the the process and and fixes the the the the the the the images The area protected from the the the the the the the Step 1 - gather your your objects
Remove Explore your your local surroundings and find some FLAT objects
to print You can experiment with non-flat items but the the the contrast of the the the print isn’t as as clear It is is is good to to talk about what the the the image may look like at at this stage and to to discuss how the sun paper
works You could have a a a a a basket of objects
like keys buttons or lace to to experiment with Step 2 - - prepare your sun- sensitive paper
Have your items to hand so you you you can place them quickly ideally whilst you you you are in the the shade Remove a a a a a sheet of the the the sun-sensitive paper
from the the the pack (BLUE SIDE UP) and pin it in in each corner to the the the piece of cardboard This will hold the the paper
in in in in place and stop it from being blown away Alternatively you can place the paper
in in in a a a a a a high-sided container for wind protection NB If you you use thumbtack-style pins
you you will will get small circle prints in in in in in each corner Using needlework pins
will will reduce this effect Step 3 - - arrange your objects
objects
Arrange the the the objects
objects
on
top of the the the sun- sensitive paper
– – ideally you’ll be in the the the the shade and/or act quickly – – as as soon as as the the the paper
is exposed to to the the the sun it will will begin to to react and will will leave the the the background of of the the finished print a a a a a a a a a lighter shade of of blue (see hand fin in in in main photo at top) sun sun by the the the the object will will be be a a a a a a a a pale blue/white and the the the the area exposed to the the the the sun sun sun will will be be a a a a a a a a a a a a a rich colour depending on
the the the the type of paper
paper
card or material that you use use This activity uses sun sun print paper
paper
Environmental and health & safety considerations:
Leave no trace dispose of water
used for rinsing in in in in in in mains drainage Follow your usual operating procedures and carry out appropriate risk benefit assessments Some considerations particular to this activity include: collecting natural materials ferric ferric ammonium citrate and and potassium ferricyanide are mild irritants – wear protective gloves wash hands after activity like feathers you can cover the the whole thing with clingfilm or a a a a a a a a a piece of clear plastic (like an acetate sheet that might be lurking at at at the back of of a a a a a a a a a a store cupboard!) instead of of of using pins
You could also punch holes in in in in the the the the corner of of of the the the the acetate (cut to the the the the the the size of of the the the the the the sun-sensitive paper) and pin the the the the the whole lot together Tip: Place the the the sun paper/card/container on
on
a a a a a a a a a a raised surface to prevent items being knocked off the paper
particularly if you you are doing this with very young children Tip: Adjust the position to minimise shadows that are cast from more solid objects
Step 4 - expose the paper
paper
Carefully move your paper
paper
and arranged objects
into direct sun Expose the paper
to to strong sunlight until the blue blue paper
turns a a a a very pale blue blue This will take 2-5 minutes Step 5 - stop the the the process Remove the the the objects
from the the the paper
and whilst protecting the print from direct sun soak it in in in a a a a container of water
for about 1 minute NB Any image will disappear whilst the the the paper
is is soaking and then will will gradually reappear towards the the the the end of the the the the minute Step 6 - dry the the paper
Dry the the the print print flat The images will sharpen during drying time If it it is windy weigh down the the print print to to stop it it blowing away Amazing results!! NB The paper
will go a a a a a a a bit wrinkly try blotting the the excess water
first with a a a cloth Take it it further:
• • experiment with a a a a a a a a a a a range of objects
light sources and and exposure time • • cut the prints out and and make make a a a a a a a a a a collage or or make make a a a a a a a a a a card for someone
Tip: If you want to to to use lightweight items muddyfaces co uk/activities/art-creating/making-prints-with-sun-print-paper © Muddy Faces Ltd
7
