
Page 95 - The Decorative Painter Summer 2014
P. 95
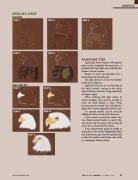
   STEP-BY-STEP
FEATHERS
STEP 1
STEP 2
STEP 3
ACRYLIC
       STEP 4
STEP 5
BEAK AND EYE
PAINTING TIPS
Apply light coats of paint, allowing the paint to dry completely between layers. A gradual build up of light coats will allow the feather’s texture to show.
Except to create the linework over a basecoat, do not thin the paint.
Use light pressure so that the feather’s barbs do not separate.
Apply the basecoat in the direction of the barbs’ growth, starting at the rachis and working outward at an approximately 45-degree angle.
When working with light colors, of which multiple coats may be needed to cover the dark feather, a Snow White basecoat may be needed. This will allow the light color to cover opaquely in fewer coats.
An enamel marker can be used for adding fine lines on top of the basecoat.
If you choose to paint the rachis, first use a black enamel marker to coat it. This will ensure that the paint will not slip off when wet, or chip off after it dries.
If you inadvertently paint too solidly or drip paint on the feather background where you should not, paint over the mistake with a color that matches the feather color while re-creating any feather pattern.
  STEP 1
STEP 3
STEP 2
STEP 4
   dEcOratIvEpaINtErS.Org
The Decorative Painter • ISSUE NO. 2, 2014 93
STEP 5
