
Page 71 - The Decorative Painter Spring 2014
P. 71
rows 2 and 3 leave some white on the tips of the petals and color with Parma Violet, making it dark at the base and lighter at the tips. On row 3 make your color a little lighter than on row 2. Row 4 is colored with Lilac, making it darker at the base, lighter at the tips, and leaving some white. Color the center with Lilac, and then around the outside edges here and there with Parma Violet.
FLOWER 2
Wet two or three petals at a time, depending on how fast you color. Use Lilac at the base of the flower and make it a medium dark, blending up the sides and toward the center but leaving a lot of white. On the tip there is a V; add a tiny bit of Lilac. Close to the center, dip the pencil in the medium and go around the center to make it darker. The center is Canary Yellow; use hard pressure but leave some white. Remember to always blend your color; you shouldn’t see any starting and stopping points.
FLOWERS 3, 4, 5, 6 AND 7
All the yellow flowers are Yellow, Canary Yellow, Or- ange, and Terra Cotta. Start with your light color on the tips, leaving some white, and go darker toward the center. No two petals are alike, so vary your colors; some petals are dark and some are light. Centers of flowers are col- ored in with Yellow. Leave some white in the middle and move out; add Canary Yellow and move out; add Orange and move out; add Terra Cotta and move out; add Sienna Brown, and finish with Dark Brown on the outside edges, next to the petals.
The bases of flowers 3 and 7 are Grass Green and True Green. All the stems of the flowers are different greens; change them up so they don’t look the same. Use Cool Grey 70% and True Green to add some shadows behind and under the leaves and flowers in the center. The petal on the ground is Canary Yellow with a little Sienna Brown. Under the can, wet a large area with medium. Start with
Cool Grey 20%. Add Cool Grey 50%, then Cool Grey 70%, followed by a little Warm Grey 90%. Make it darker under the can and fade out to nothing.
FINISHING
When your fabric is dry, use the small end of the IDenti-pen to outline everything you want to stand out, such as the watering can. Use the Micron 01 pen to make veins down the leaves and to outline all the petals of the flowers. At the base I make an uneven W for the veins of the petals. Also, make one or two zigzag lines around the centers. On flowers 3, 4, and 7, make small Vs where the green is. You’re finished! Wasn’t that fun?
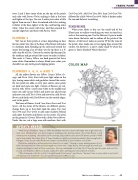
COLOR MAP
1
25 1
3
5 34
8 15
2
13 714
4
6
Fabric PainT
artist’s sketch
While living in Pasadena, Texas, in 1986, Bonnie Riley went into a local craft supply store to get some mac- ramé cord. Standing there was Joyce Jorgenson teaching acrylic painting classes. She invited Bonnie in and introduced her to painting. She started class the next day. Joyce told the class about SDP (Bonnie joined in 1988) and a local chapter, Decorative Artists of Texas. Needless to say, Bonnie joined immediately. After moving back to Arlington, Texas, she joined the Bluebonnet Chapter and has been an active member since 2008.
Bonnie has worked as a professional picture framer for six years. “Framing so many amazing pieces of art, I
think it increased my love of art and encouraged me to learn more,” states Bonnie. She has taught at several local
chapters and hopes to teach at future conventions. She has participated in the State Fair of Texas the past few years and won first-, second-, and third-place ribbons in acrylics, watercolors, fabric painting, and colored pencils on fabric.
“After thinking about this for a while, I decided I need to live forever,” says Bonnie, “because I have so many ideas in my head it will take forever to finish them.” You can reach Bonnie at brknchi@yahoo.com.
dEcOratIvEpaINtErS.Org
The Decorative Painter •
ISSUE NO. 1, 2014 69
