
Page 64 - The Decorative Painter Summer 2017
P. 64
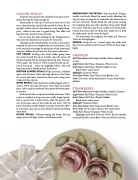
ADDING PETALS
All petals are painted with sideload technique descri- bed in the Step-by-Step on page 59.
These petals are the top as well as the back row of the roses; therefore they should fade toward the back. By us- ing light strokes close to one another, some might disap- pear – which in this case is a good thing. This effect will help the other petals to come forward.
Do not lose the dark shading for the background. It will create the dimension necessary for the petals.
All petals can be retouched later. As much as you may be tempted, do not try to complete the rose at this point. This is the time only to arrange the placement of the major petal structure. Follow the pictures for the correct placement. TOP PETALS: Starting with small strokes going from the center toward the top or outside, wipe the excess off the brush gently but do not load the brush with Titanium White again. The Titanium White is placed on the top cor- ner of the brush – where the highlight will be. This will help the petals to blend between themselves.
BOTTOM CENTER PETALS: Wipe the brush. Sideload again with Titanium White and wipe off excess. Start from the center and move toward the lower part, using close strokes for these petals.
OPEN PETALS: Wipe the brush. Sideload again with Ti- tanium White and wipe off excess. Start from the outside parts, left or right as preferred, then paint the bottom part of the rose.
At this point take a step back and look at the rose. If the center is crooked, or if you see some oddly shaped petals, this is a great time to adjust them, while the paint is still wet. If you lose some of the petals do not worry. Not all petals should be totally defined and that creates the effect of a real rose. Also you can later detail the petals and bring them back.
OTHER PETALS: Without wiping the brush, fill any empty space with light strokes to add more petals.
SMOOTHING THE PETALS: Wipe the brush. Using a smaller size brush, blend the major petals, checking the Step-by-Steps on page 59 to emphasize the dimension of the rose structure. Gently blend the side petals creating the transition from one roll to another. Then gently blend the center. With the same brush, stroke a few more petals toward the center, then let them fade. Make sure to keep the darkest part of the center for depth.
Use more darks to strengthen the depth and Titanium White for the highlights.
CENTER: Using the no. 1 round, apply the seeds with Raw Sienna and then add Titanium White for their high- lights.
CHERRIES
Mid Value Basecoat: Purple Madder+Brown Madder (1:tch)
Light Value: Mid Value+Titanium White (1:tch) Dark Value: Mid Value+Purple Madder (1:tch)
Blend where colors meet.
Highlight: Titanium White
Very Dark Value: Dark Value+Ivory Black (1:tch)
Stem: Use values of the warm leaves. Accent with Purple Madder.
STRAWBERRY
Mid Value Basecoat: Purple Madder+Alizarin Crimson Light Value: Mid Value+Titanium White (1:tch)
Dark Value: Mid Value+Purple Madder
Blend where colors meet.
Highlight: Titanium White
Very Dark Value: Dark Value+Ivory Black (1:tch) Green Top: Use the same values as the warm leaves. Seeds: Raw Sienna+Titanium White (1:tch)
Highlight seeds with Titanium White. For the shadow use Purple Madder+Ivory Black+Titanium White (1:tch:tch).
