
Page 32 - The Decorative Painter Spring 2017
P. 32
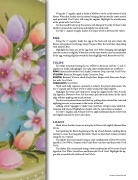
 Using the 1⁄4" angular, apply a shade of Mulberry to the inside center of each flower. When dry, further tint the center, bringing the tint into the center area of each petal with Vivid Violet, still using the angular. Highlight the outside areas of the petals with Cool White.
Use the round brush to tap the centers with Marigold. Use the 5/0 liner to dot Mulberry around the center area and slightly into each petal.
Use the 3⁄8" angular to apply shades of Antique Green in between the violets.
EGG
Using the 1⁄2" angular, shade the egg in the back and top area where the flower arrangement overhangs using Turquoise Blue first and then deepening with Midnite Blue.
Highlight the front area of the egg with Cool White, bringing the highlight into the center area slightly. When dry, use the same brush to tint the center area of the egg, working slightly toward the front highlight with Boysenberry Pink.
TULIPS
The tulips are painted using the no. 4 filbert to basecoat, and the 1⁄4" and 3⁄8" angulars to shade and highlight. The tulip color combinations are as follows: PINK: Basecoat Poodleskirt Pink, shade Cinnamon Drop, tint with Vivid Violet. YELLOW: Basecoat Pineapple, shade Cinnamon Drop.
PURPLE: Basecoat Wisteria, shade Purple Rain, deepen with Dioxazine Purple, tint with Vivid Violet.
HIGHLIGHT: Cool White.
Work each tulip segment separately to achieve the proper dimension. Use the 3⁄8" angular and Antique Green to shade around the tulips slightly.
Highlight the stems and tulip leaves using the dagger brush with Avocado Dip tipped in Plantation Pine. For the stems, pull the brush down on the chisel edge without applying too much pressure.
The leaves are painted from each leaf tip, pulling down toward the stem and applying pressure as you come to the center of the leaf.
Adding a little “squiggle ’n’ shake” here and there will give some added di- mension and interest. Highlight or deepen with the same colors as needed.
Use the 3⁄8" angular and Antique Green to apply additional shades in between and slightly around the leaves and stems.
LILACS
Mark where the lilac stems are using the 5/0 liner with slightly thinned Raw Sienna.
Start painting the florets beginning at the tip of each branch, working down and out to create the triangular lilac form. There are four short strokes per floret using the no. 2 round.
The lighter lilacs are painted using a color combination of Deep Periwinkle tipped in Cool White. Deepen with Purple Rain; tint here and there with Vivid Violet.
The darker lilacs are painted using a color combination of Dioxazine Purple tipped in Cool White, tinted here and there with Vivid Violet. Highlight the up- per side as needed with strokes of Cool White.
DECORATIVEPAINTERS.ORG
