
Page 4 - Coroshingle
P. 4
3
4
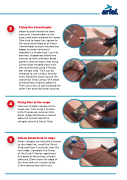
Fixing the Coroshingles
Begin by positioning the base course of Coroshingles at the eaves and work towards the verge. Take care to keep tiles square to the eaves and verge at all times. Coroshingles feature interlocking edges to make horizontal alignment a simple task. Lay into position, staggering alternative courses to form a broken bond pattern, and nail each strip using 20mm large headed clout nails. We recommend using 5 fixings per shingle strip. Tiles can be trimmed to size using a Stanley knife. Bond the eaves course tile and Detail Strip using a thin bead of bituminous sealant adhesive. Then use a hot air gun to bond the other tiles onto the lower courses.
Fixing tiles at the verge
Mark out shingles square to the verge line. Trim using a Stanley knife if necessary and nail into place. Apply bituminous sealant adhesive to then bond the shingles onto the Detail Strip.
Attach Detail Strip to ridge
When shingles are laid and trimmed to the ridge line, unroll the Detail Strip and form it centrally over the roof ridge. Complete the fixing
of the Detail Strip by applying a thin bead of bituminous sealant adhesive 25mm from the edge of the strip and nail in place using 20mm galvanised clout nails.
5
