
Page 15 - ALG Issue 4 2021
P. 15
Make a Compost
‘Bin’ in a Bottle
In a compost bin a wonderful process is taking place. Organic waste such
as kitchen peelings, weed foliage
and other plant material, cardboard and dead insects are converted by millions of bacteria and micro and macro organisms such as worms,
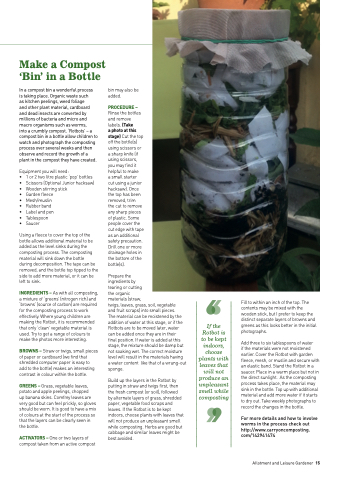
into a crumbly compost. ‘Rotbots’ – a compost bin in a bottle allow children to watch and photograph the composting process over several weeks and then observe and record the growth of a plant in the compost they have created.
Equipment you will need:
• 1 or 2 two litre plastic ‘pop’ bottles • Scissors (Optional Junior hacksaw) • Wooden stirring stick
• Garden fleece
• Mesh/muslin
• Rubber band
• Label and pen
• Tablespoon
• Saucer
Using a fleece to cover the top of the bottle allows additional material to be added as the level sinks during the composting process. The composting material will sink down the bottle during decomposition. The tape can be removed, and the bottle top tipped to the side to add more material, or it can be left to sink.
INGREDIENTS – As with all composting, a mixture of ‘greens’ (nitrogen rich) and ‘browns’ (source of carbon) are required for the composting process to work effectively. Where young children are making the Rotbot, it is recommended that only ‘clean’ vegetable material is used. Try to get a range of colours to make the photos more interesting.
BROWNS – Straw or twigs, small pieces of paper or cardboard (we find that shredded computer paper is easy to add to the bottle) makes an interesting contrast in colour within the bottle.
GREENS – Grass, vegetable leaves, potato and apple peelings, chopped
up banana skins. Comfrey leaves are very good but can feel prickly, so gloves should be worn. It is good to have a mix of colours at the start of the process so that the layers can be clearly seen in the bottle.
ACTIVATORS – One or two layers of compost taken from an active compost
bin may also be added.
PROCEDURE –
Rinse the bottles and remove labels. (Take
a photo at this stage) Cut the top off the bottle(s) using scissors or a sharp knife (if using scissors, you may find it helpful to make
a small starter cut using a junior hacksaw). Once the top has been removed, trim
the cut to remove any sharp pieces of plastic. Some people cover the cut edge with tape as an additional safety precaution. Drill one or more drainage holes in the bottom of the bottle(s).
Prepare the
ingredients by
tearing or cutting
the organic
materials (straw,
twigs, leaves, grass, soil, vegetable
and fruit scraps) into small pieces.
The material can be moistened by the addition of water at this stage, or if the Rotbots are to be moved later, water can be added once they are in their
final position. If water is added at this stage, the mixture should be damp but not soaking wet. The correct moisture level will result in the materials having a water content like that of a wrung-out sponge.
Build up the layers in the Rotbot by putting in straw and twigs first, then the fresh compost (or soil), followed
by alternate layers of grass, shredded paper, vegetable food scraps and leaves. If the Rotbot is to be kept indoors, choose plants with leaves that will not produce an unpleasant smell while composting. Herbs are good but cabbage and similar leaves might be best avoided.
If the Rotbot is to be kept indoors, choose plants with leaves that will not produce an unpleasant smell while composting
Fill to within an inch of the top. The contents may be mixed with the wooden stick, but I prefer to keep the distinct separate layers of browns and greens as this looks better in the initial photographs.
Add three to six tablespoons of water
if the materials were not moistened earlier. Cover the Rotbot with garden fleece, mesh, or muslin and secure with an elastic band. Stand the Rotbot in a saucer. Place in a warm place but not in the direct sunlight. As the composting process takes place, the material may sink in the bottle. Top up with additional material and add more water if it starts to dry out. Take weekly photographs to record the changes in the bottle.
For more details and how to involve worms in the process check out http://www.carryoncomposting. com/142941474
Allotment and Leisure Gardener 15
