
Page 47 - Total Portfolio
P. 47
print & branding material
RetinaVueTM Network 8-Step Setup Process
To Do:
1.
When you receive your RetinaVue Imager, call 865-622-8380 to set up an initial account with the RetinaVue Network.
2.
You will receive an email via Adobe’s eSign service that includes your RetinaVue License and Services Agreement.
3.
Electronically sign and submit your RetinaVue License and Services Agreement.
4.
You will receive an email from RetinaVue Network System with your initial username & password and a link to the RetinaVue customer portal.
5.
6.
Go to the RetinaVue customer portal and
complete your RetinaVue Network account registration.
Upon completion of your account registration, download the RetinaVue Software from the RetinaVue customer portal onto the PC you will be using to transfer images to the RetinaVue Network.
7.
Launch the RetinaVue Network software. Enter your RetinaVue Network Software Activation Key from the RetinaVue Network Customer Portal Installers page into the RetinaVue Network software.
8.
Connect your RetinaVue Imager charging dock to the PC and you are ready to begin submitting images from the RetinaVue software and receiving reports back in your RetinaVue customer portal.
Mat. No. 7255801, DIR 80021631 Ver. A Revision date: 2016-07
RetinaVue Network Support: 8AM - 5PM EST • Monday - Friday • 865.622.83
How-To Guides
80
Before the exam:
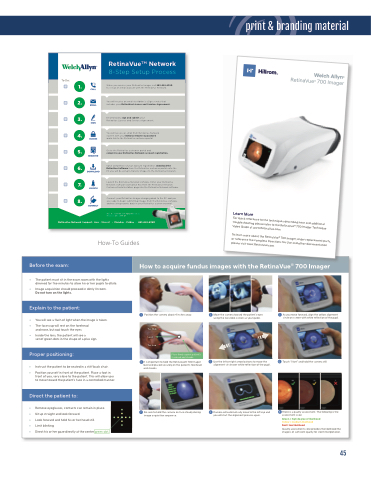
How to acquire fundus images with the RetinaVue® 700 Imager
• The patient must sit in the exam room with the lights dimmed for five minutes to allow his or her pupils to dilate.
• Image acquisition should proceed in dimly lit room. Do not turn on the lights.
Explain to the patient:
• You will see a flash of light when the image is taken.
• The face cup will rest on the forehead
and nose, but not touch the eyes.
• Inside the lens, the patient will see a
set of green dots in the shape of a plus sign.
Proper positioning:
• Instruct the patient to be seated in a stiff back chair.
• Position yourself in front of the patient. Place a foot in front of you, very close to the patient. This will allow you to move toward the patient’s face in a controlled manner.
• Remove eyeglasses, contacts can remain in place.
• Sit up straight and look forward.
• Look forward and hold his or her head still.
• Limit blinking
• Direct his or her gaze directly at the center green dot.
1. Position the camera about 4 inches away.
Too High Level Too Low
4. It is important to hold the RetinaVue® 700 Imager level and placed securely on the patient’s forehead and cheeks.
7. Be sure to hold the camera on face steady during image acquisition sequence.
2. Move the camera toward the patient’s eyes using the live video screen as your guide.
5. Use the left or right arrow buttons to move the alignment circle over white reflection of the pupil.
8. Camera will automatically move to the left eye and you will start the alignment process again.
3. As you move forward, align the yellow alignment circle on screen with white reflection of the pupil.
6. Touch “Start” and hold the camera still.
9. There is a quality assessment. The following is the assessment scale:
Green = high degree of likelihood
Yellow = medium likelihood
Red = low likelihood
Quality assessment score provides the likelihood the image is of sufficient quality for client interpretation.
Place firmly against patient’s forehead and cheeks.
Direct the patient to:
45
5-Step Quick Start Guide
Troubleshooting Image Quality
Use the live video
1 screen to guide the
camera onto the face.
Good quality image
It is very important 2 to place the camera
on the patient’s face.
Clean the lens
with an appropriate cleaning cloth.
Use arrows to move 3 the alignment circle
left or right.
Partial blink
Ask the patient to keep his or her eye open.
Move the camera
up or down on the
4 patients’ face to align
Allow the patient to sit in a darkened room for at least 5 minutes.
the pupil into the yellow alignment circle.
Overall dark image
Ensure patient can
For quick reference to the techniques described here and additional troubleshooting please refer to the RetinaVue® 700 Imager Technique Video Guide at www.RetinaVue.com
see the fixation pattern 5 and then press start.
To learn more about the RetinaVue® 700 Imager, order replacement parts, or reference the complete Directions for Use and other documentation please visit www.RetinaVue.com
Hold camera still until the image is captured.
Mat. 728141, DIR 80024876 Ver.A
Revision date: 2019-04
©2019 WelchAllyn, Inc.
Place firmly against patient’s forehead and cheeks.
Problem
Solution
Dirty lens
Learn More
