
Page 63 - The Decorative Painter Fall 2014
P. 63
form of and give dimension to the
mushrooms (and later, the garlic
bulbs). The highlights should begin
in the center section, with the color
fading into the shadow areas. A
mop brush can be used to keep col-
ors soft. Applying a thin coat of Jo
Sonja’s Retarder and Antiquins Me-
dium to the surface before painting
will also help achieve softness.
STEP 4: For the final highlights, add
Titanium White to the dirty brush.
Creating the highlights with a drier
brush than in the previous steps will
add a bit of texture. The brightest
highlights should be in the round
areas of the mushrooms. The side sections receive duller highlights, except in the case of the mushroom that lies in front of the soup pot; this one has highlights on the top also. Clean the brush and finish the mushrooms by apply- ing a wash of Raw Sienna to the shadow areas.
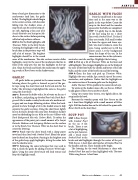
GARLIC
GARLIC WITH FACES
Paint the small bowl at the same time and in the same way as the garlic in the steps below. Create the soup in the bowl and the wooden spoon after the bulbs are completed. STEP 1: Lightly line in the details of the face using the no. 1 short liner with Smoked Pearl. It’s fine if they are streaky. Pull small strokes to form the upper and lower eye- lids. Use short strokes to create the eyes, being careful not to fill the entire space. Let the background form the shape of the eye. In the same manner, line in the eyebrows,
mustache, nostrils, and lips. Highlight the lettering. STEP 2: Pick up a bit of Titanium White on the liner and add highlights. The strongest highlights are on the bridge of the nose of the front bulb, the cheeks and brows of the side bulbs, and the center of the bowl’s rim and the lettering. STEP 3: Clean the liner and pick up Titanium White. Highlight the eyes, eyelids, lips, nostrils, tips of the noses, mustaches, and eyebrows. Notice that the highlights on the center section of the main garlic are the brightest.
Add a Titanium White sparkle to the center of each eye.
To warm up the shadow areas a bit, use the no. 6 filbert to add glazes of Raw Sienna or Brown Earth.
Using very watery Raw Sienna, very lightly dab in the soup inside the bowl.
Basecoat the wooden spoon with Raw Sienna on the no. 1 short liner. Highlight with a small amount of Yellow Light. Pull the shadow line on the left side of the spoon with Brown Earth on the short liner.
SOUP POT
STEP 1: Base the pot
with Smoked Pearl
on the no. 8 flat
brush. There is not
a lot of highlighting
on the pot; however,
add a touch more
Smoked Pearl to the
brush and add highlights through the center of the pot. With the no. 1 short liner, add touches of Smoked Pearl to the handles and rim. These should not be bright.
The lettering for the word Mushroom is done with Smoked Pearl first and is then highlighted with Titanium White using the no. 1 short liner.
All garlic bulbs are painted in the same manner. The lettering above the garlic is formed as part of the gar- lic tops using the short liner and the brush-mix for the bulbs. The lettering is highlighted the same as the garlic using the short liner.
STEP 1: Basecoat the bulbs with a lot of water on the no. 6 or 8 filbert, and picking up Smoked Pearl+tch Dark Back- ground Mix to make a washy brush-mix of a medium val- ue gray and use shape-following strokes. Allow the back- ground to show through a bit in the shaded areas to help separate the garlic sections. Using the short liner, lightly line in the faces; details will come later. Reinforce shadow areas by sideloading the no. 8 flat or the no. 6 filbert with Dark Background Mix+tch Carbon Black. To soften the appearance of the paint, put a small amount of Jo Sonja’s Retarder Medium and Antiquing Meduim on the surface or in the brush. Use Titanium White on the short liner to create the lettering.
STEP 2: Pinch-wipe the dirty brush with a damp paper towel and then load with Smoked Pearl. Blend the paint into the brush on the palette. Starting in the brightest area of the garlic keep apply highlights, letting the color fade into the shadow areas.
STEP 3: Following the same technique that was used in Step 2, finish the garlic by adding Titanium White high- lights. Using the same dirty brush will lend texture and keep this highlight small.
ACRYLIC
dEcOratIvEpaINtErS.Org
The Decorative Painter • ISSUE NO. 3, 2014 61
