
Page 34 - 3DF Zephyr
P. 34
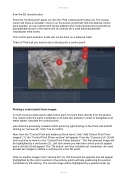
from the 3D reconstruction. From the "Control point" panel (1) click the "Pick control point" button (2). The mouse cursor will show a crosshair: move in on the scene (3) and left click the desired control point position. A new control point will be added to the control points list (4) and will be automatically shown in the scene.unti di controllo (4) e sarà automaticamente visualizzato nella scena. This control point selection mode can not be done on a textured mesh. That's it! That's all you need to do to directly pick a control point! Picking a control point from images A much more accurate way to add control point is to pick them directly from the photos. You need to pick the same coordinate on at least two pictures in order to triangulate and make zephyr calculate the control points. Lets clear the previously created control points by right clicking on the Point List and left clicking on “remove all”. Click Yes to confirm. Now, from the “Control Point and distances Dock menu” click “Add Control Point From images” (1): the “Control Point Picker window” will appear. From the “Camera List” (2) left click a picture to view it in the “Control Point Picker Selector”. The first selected image will be highlighted by a red border (3). Left click where you want the control point to appear and a red dot (5) will appear. The “Ok button” won't be clickable yet: remember, we need at least two images to define a control point in the 3D world. Click on another image in the "camera list" (2): this time also the epipolar line will appear (highlighted by the color inversion in the picture) which will help positioning the second coordinate by left clicking. The current image will be highlighted by a yellow border (4).
