
Page 192 - Green - Maritime Archaeology: A Technical Handbook. 2nd ed
P. 192
Chapter 6: Photogrammetric Techniques 171
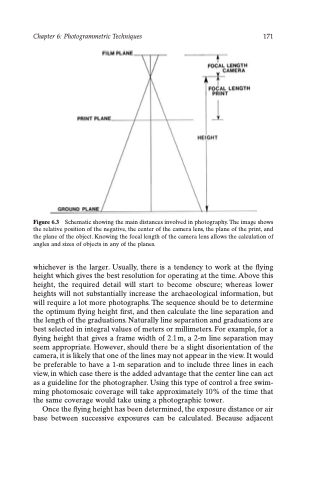
Figure 6.3 Schematic showing the main distances involved in photography. The image shows the relative position of the negative, the center of the camera lens, the plane of the print, and the plane of the object. Knowing the focal length of the camera lens allows the calculation of angles and sizes of objects in any of the planes.
whichever is the larger. Usually, there is a tendency to work at the flying height which gives the best resolution for operating at the time. Above this height, the required detail will start to become obscure; whereas lower heights will not substantially increase the archaeological information, but will require a lot more photographs. The sequence should be to determine the optimum flying height first, and then calculate the line separation and the length of the graduations. Naturally line separation and graduations are best selected in integral values of meters or millimeters. For example, for a flying height that gives a frame width of 2.1 m, a 2-m line separation may seem appropriate. However, should there be a slight disorientation of the camera, it is likely that one of the lines may not appear in the view. It would be preferable to have a 1-m separation and to include three lines in each view, in which case there is the added advantage that the center line can act as a guideline for the photographer. Using this type of control a free swim- ming photomosaic coverage will take approximately 10% of the time that the same coverage would take using a photographic tower.
Once the flying height has been determined, the exposure distance or air base between successive exposures can be calculated. Because adjacent
