
Page 27 - JB Industries
P. 27
JUST BETTER SINCE 1967 | HVAC TOOLS, VALVES AND FITTINGS Refrigerant Hoses
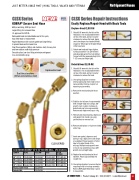
CLSX Series
KOBRA® Secure Seal Hose
800 psi working; 4000 psi burst
Larger fitting for increased flow
UL approved for R410A
Removable head and rebuildable seal kit for quick, easy field repair or replacement
Angled depressor with custom gasket and large fitting to prevent leaks and increase flow
Dual thrust washers (Teflon and stainless steel) for easy turn and free rotation under high pressure
Smooth action, low-loss fitting minimizes refrigerant loss and prevents spray
CLSX Series Repair Instructions
Easily Replace/Repair Head with Basic Tools Replace Head CLSX-RH
1. Attach 3/8" wrench to the flats of the 1 head base. Use an adjustable wrench
on hex of the barb, and turn counter clockwise to remove the head. Apply
one to two drops of a standard thread sealant or Teflon tape to the pipe thread of the hose barb.
2. Attach new head and finger tighten, turning clockwise. Use 3/8" wrench and adjustable wrench to fully tighten. Torque to 6ft/lbs (approximately 3/4 to 1-1/2 turns past finger tight).
Rebuild Head CLSX-RK
Dual thrust washers (Teflon and stainless steel)
CLSX SERIES KOBRA® 1/4" X 1/4" SECURE SEAL
(PSI 800/4000)
B/Y/R 3 PACK
CCLSX-36 CCLSX-48 CCLSX-60 CCLSX-72
LENGTH
BLUE
YELLOW
CLSX-36Y CLSX-48Y CLSX-60Y CLSX-72Y CLSX-RH CLSX-RK
RED
CLSX-36R CLSX-48R CLSX-60R CLSX-72R
36" (91cm)
48" (122cm)
60" (152cm)
72" (182cm) Replaceable Head Rebuild Kit
CLSX-36B CLSX-48B CLSX-60B CLSX-72B
Replaceable Head
1. Attach 3/8" wrench to the flats of the head base. Use an adjustable wrench on hex of the barb, and turn counter clockwise to remove the head.
2. Use spring clip pliers to remove internal spring clip from inside of end cap assembly. Remove coupler nut exposing cup assembly.
3. Remove the metal and nylon thrust washers.
4. Stabilize slot at base of cup assembly with straight-edge and using a 3/8" wrench, turn counter clockwise to detach end cap from cup assembly. Remove and replace end cap o-ring.
5. Remove and discard spring, depressor, and gasket from inside cup using pointed hook or removal tool.
6. Remove and replace o-ring from slotted end of cup.
7. Insert new gasket, depressor and spring in cup. Apply one to two drops of a standard thread sealant or Teflon tape to the pipe thread of the
end cap. Reattach end cap with new o-ring to cup assembly using a 3/8" wrench and a straight edge.
8. Replace the metal and nylon thrust washers. Place cup assembly into coupler nut.
9. Use spring clip pliers to secure internal snap ring inside of end cap assembly. Refer to REPLACE HEAD Step 1 and 2 to reassemble.
2
1
2
3
4
5
6
7
8 9
CLSX SERIES
JB INDUSTRIES • Product Catalog 52 • 800.323.0811 • sales@jbind.com 27
