
Page 14 - April 2021
P. 14
4 - H F O O D A N D N U T R I T I O N
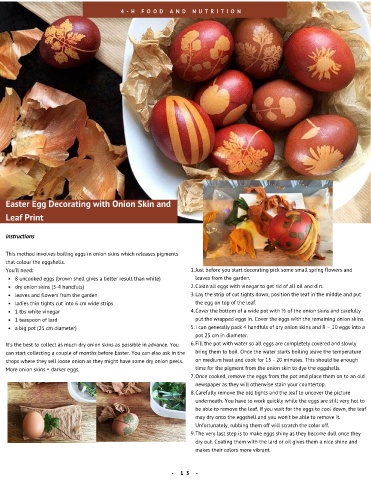
Easter Egg Decorating with Onion Skin and
Leaf Print
instructions
This method involves boiling eggs in onion skins which releases pigments
that colour the eggshells.
You'll need: 1. Just before you start decorating pick some small spring flowers and
8 uncooked eggs (brown shell gives a better result than white) leaves from the garden.
dry onion skins (3-4 handfuls) 2. Clean all eggs with vinegar to get rid of all oil and dirt.
leaves and flowers from the garden 3. Lay the strip of cut tights down, position the leaf in the middle and put
ladies thin tights cut into 6 cm wide strips the egg on top of the leaf.
1 tbs white vinegar 4. Cover the bottom of a wide pot with ½ of the onion skins and carefully
1 teaspoon of lard put the wrapped eggs in. Cover the eggs with the remaining onion skins.
a big pot (25 cm diameter) 5. I can generally pack 4 handfuls of dry onion skins and 8 – 10 eggs into a
pot 25 cm in diameter.
It's the best to collect as much dry onion skins as possible in advance. You 6. Fill the pot with water so all eggs are completely covered and slowly
can start collecting a couple of months before Easter. You can also ask in the bring them to boil. Once the water starts boiling leave the temperature
shops where they sell loose onion as they might have some dry onion peels. on medium heat and cook for 15 - 20 minutes. This should be enough
More onion skins = darker eggs. time for the pigment from the onion skin to dye the eggshells.
7. Once cooked, remove the eggs from the pot and place them on to an old
newspaper as they will otherwise stain your countertop.
8. Carefully remove the old tights and the leaf to uncover the picture
underneath. You have to work quickly while the eggs are still very hot to
be able to remove the leaf. If you wait for the eggs to cool down, the leaf
may dry onto the eggshell and you won't be able to remove it.
Unfortunately, rubbing them off will scratch the color off.
9. The very last step is to make eggs shiny as they become dull once they
dry out. Coating them with the lard or oil gives them a nice shine and
makes their colors more vibrant.
- 1 3 -