
Page 9 - 2009 AMA Winter
P. 9
BUILD A CLIMBING ANCHOR
In climbing, as in most things in life, there are plenty of ways to skin a cat; as long as it is safe and works for you, great. In terms of climbing anchors, safe means having:
a. Equal loading. Unless there is absolute- ly no doubt that the protection you are attached to is bombproof then you should always back it up with one or more extra pieces and share the load equally; at some stage, your life and that of your partner will depend upon it. If there is any doubt then keep putting it out – it is better to die with an empty rack!
b. Independent. Each piece of protection should be isolated from the others so that no shock loading will occur should a piece fail.
c. 60° Vector (or less). That is the angle between pieces of protection when mea- sured at the point they connect. This is important as (assuming that two pieces of gear are placed) each anchor will take 60% of the load, at 90° each anchor takes 100% of the load! If you’re in any doubt then dust of your physics books and look up Newton’s Law of Moments, or grab an engineer! If your angles are great then you can reduce them by selecting pieces of gear that are closer together, by putting an extra piece out between them or by simply moving the equalisation point further away. Again, if you’re in any doubt then keep building.
There are numerous ways in which you can build the anchor and the more common way you will see at the crag is with the use of numerous knotted slings. Try the follow- ing way however and you will lighten your
By Sven Hassall, MIA
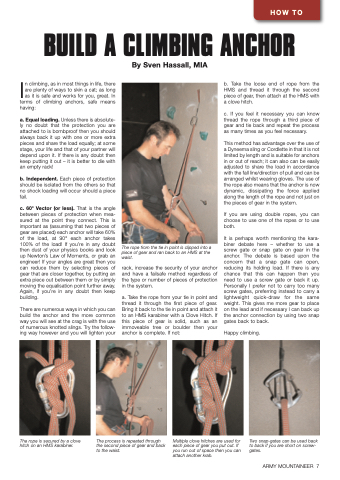
The rope from the tie in point is clipped into a piece of gear and ran back to an HMS at the waist.
rack, increase the security of your anchor and have a failsafe method regardless of the type or number of pieces of protection in the system.
a. Take the rope from your tie in point and thread it through the first piece of gear. Bring it back to the tie in point and attach it to an HMS karabiner with a Clove Hitch. If this piece of gear is solid, such as an immoveable tree or boulder then your anchor is complete. If not:
b. Take the loose end of rope from the HMS and thread it through the second piece of gear, then attach at the HMS with a clove hitch.
c. If you feel it necessary you can know thread the rope through a third piece of gear and tie back and repeat the process as many times as you feel necessary.
This method has advantage over the use of a Dyneema sling or Cordlette in that it is not limited by length and is suitable for anchors in or out of reach; it can also can be easily adjusted to share the load in accordance with the fall line/direction of pull and can be arranged whilst wearing gloves. The use of the rope also means that the anchor is now dynamic, dissipating the force applied along the length of the rope and not just on the pieces of gear in the system.
If you are using double ropes, you can choose to use one of the ropes or to use both.
It is perhaps worth mentioning the kara- biner debate here – whether to use a screw gate or snap gate on gear in the anchor. The debate is based upon the concern that a snap gate can open, reducing its holding load. If there is any chance that this can happen then you need to use a screw gate or back it up. Personally I prefer not to carry too many screw gates, preferring instead to carry a lightweight quick-draw for the same weight. This gives me more gear to place on the lead and if necessary I can back up the anchor connection by using two snap gates back to back.
Happy climbing.
The rope is secured by a clove The process is repeated through hitch on an HMS karabiner. the second piece of gear and back
to the waist.
Multiple clove hitches are used for each piece of gear you put out. If you run out of space then you can attach another krab.
Two snap-gates can be used back to back if you are short on screw- gates.
HOW TO
ARMY MOUNTAINEER 7
