
Page 11 - Flavio Catelogue - 2023_Neat
P. 11
3463 201 URINALS & PARALEGIC
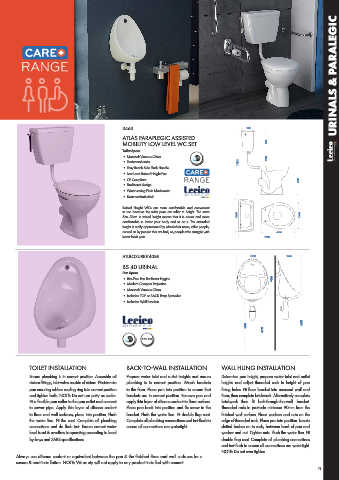
ATLAS PARAPLEGIC ASSISTED
MOBILITY LOW LEVEL WC SET 361
Toilet Specs
• Material: Vitreous China 250
• Horizontal outlet 1033
• Easy Reach Side Flush Handle
• Low Level Raised Height Pan
• CE Compliant 459
• Traditional design
• Water saving Flush Machanism
• Seat not included
Raised Height WCs are more comfortable and convenient
to use because the toilet pans are taller in height. The extra
5cm-12cm in raised height means that it is easier and more 460 360
comfortable to lower your body and sit on it. The extended
height is really appreciated by wheelchair users, taller people,
as well as by people that are frail, or, people who struggle with 464
lower back pain. 790
ATLBOXURI0T40BE 300 245
BS 40 URINAL
Pan Specs
• Rim-Free Pan For Better Hygine 400
• Modern Compact Projection
• Material: Vitreous China
• Includes: TOP or BACK Entry Spreader
• Includes: Wall Brackets
600 650
470
TOILET INSTALLATION BACK-TO-WALL INSTALLATION WALL HUNG INSTALLATION
Ensure plumbing is in correct position. Assemble all Prepare water inlet and outlet heights and ensure Determine pan height, prepare water inlet and outlet
cistern fittings, inlet valve on side of cistern. Fit cistern to plumbing is in correct position. Attach brackets heights and adjust threaded rods to height of pan
pan ensuring rubber sealing ring is in correct position to the floor. Place pan into position to ensure that fixing holes. Fit floor bracket into recessed wall and
and tighten bolts. NOTE: Do not use putty as sealer. brackets are in correct position. Remove pan and floor, then complete brickwork. Alternatively complete
Fit a flexible pan collar to the pan outlet and connect apply thin layer of silicone sealant to floor surface. brickwork then fit bolt-through-the-wall bracket.
to sewer pipe. Apply thin layer of silicone sealant Place pan back into position and fix screw to the Threaded rods to protrude minimum 90mm from the
to floor and wall surfaces, place into position. Flush bracket. Flush the water line. Fit double flap seat. finished wall surface. Place washers and nuts on the
the water line. Fit the seat. Complete all plumbing Complete all plumbing connections and test flush to edge of threaded rods. Place pan into position. Locate
connections and do flush test. Ensure correct water ensure all connections are watertight. slotted bushes on to rods, between back of pan and
level is set & overflow is operating according to local washer and nut. Tighten nuts. Flush the water line. Fit
by-laws and SABS specifications. double flap seat. Complete all plumbing connections
and test flush to ensure all connections are watertight.
NOTE: Do not over tighten.
Always use silicone sealant or equivalent between the pan & the finished floor and wall surfaces for a
secure & neat installation. NOTE: Warranty will not apply to any product installed with cement.
11