
Page 22 - KCRPCA Jan Feb 2018
P. 22
reach under the car, make the adjust- ment, then lower the car. Then in order for the suspension to settle, you have to roll the car back a few feet, then forward, and then take your measurement. If you have long skinny arms and can reach under the car to make the adjustments, then there is no need to roll the car, you can then take your measurements. As you might imagine, you will be rolling the car back and forth quite a few times throughout the process.
Photos by Karl Wilen
22
Jan / Feb 2018
The order I do this is rear to front, and make my adjustments in this order:
Ride height/corner balance (which is an another article in itself), caster, camber, and nally toe.
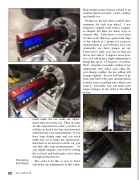
Pictures to the left show camber mea- surement for each rear wheel. I use longacre’s digital scale with a magnet- ic adapter, but there are many ways to measure this. I also have a set of arms for this scale that lays against the edge of the wheels at 3 points for a precise measurement as well which is how you commonly see these gauges set up. From left to right, you can see that our driver rear side is .2 degrees more posi- tive, so I will make a slight adjustment to bump that up to -1.8 degrees of camber. Note: Anytime you make camber or toe adjustment, they affect each other, IE, you change camber, the toe setting will change slightly. So you will have to go back and forth with your measurements to make sure everything stays where you want it. Just make sure you make your major changes in the order I described before.
