
Page 55 - DP Vol 19 No 6 pw_Neat
P. 55
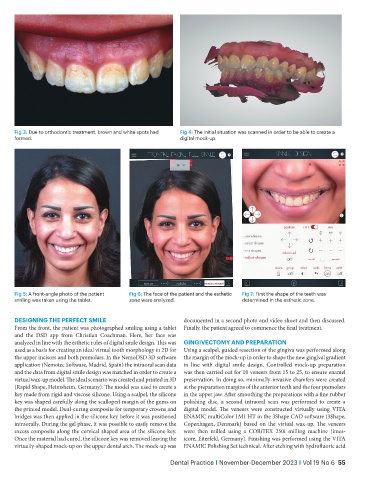
Fig 3: Due to orthodontic treatment, brown and white spots had   Fig 4: The initial situation was scanned in order to be able to create a
          formed.                                               digital mock-up.


          Fig 5: A front-angle photo of the patient   Fig 6: The face of the patient and the esthetic   Fig 7: First the shape of the teeth was
          smiling was taken using the tablet.   zone were analyzed.                 determined in the esthetic zone.


          Designing the perfect smile                            documented in a second photo and video shoot and then discussed.
          From the front, the patient was photographed smiling using a tablet   Finally, the patient agreed to commence the final treatment.
          and the DSD app from Christian Coachman. Here, her face was
          analyzed in line with the esthetic rules of digital smile design. This was   gingivectomy anD preparation
          used as a basis for creating an ideal virtual tooth morphology in 2D for   Using a scalpel, guided resection of the gingiva was performed along
          the upper incisors and both premolars. In the NemoDSD 3D software   the margin of the mock-up in order to shape the new gingival gradient
          application (Nemotec Software, Madrid, Spain) the intraoral scan data   in line with digital smile design. Controlled mock-up preparation
          and the data from digital smile design was matched in order to create a   was then carried out for 10 veneers from 15 to 25, to ensure enamel
          virtual wax-up model. The ideal scenario was created and printed in 3D   preservation. In doing so, minimally-invasive chamfers were created
          (Rapid Shape, Heimsheim, Germany). The model was used to create a   at the preparation margins of the anterior teeth and the four premolars
          key made from rigid and viscose silicone. Using a scalpel, the silicone   in the upper jaw. After smoothing the preparations with a fine rubber
          key was shaped carefully along the scalloped margin of the gums on   polishing disc, a second intraoral scan was performed to create a
          the printed model. Dual-curing composite for temporary crowns and   digital model. The veneers were constructed virtually using VITA
          bridges was then applied in the silicone key before it was positioned   ENAMIC multiColor 1M1 HT in the 3Shape CAD software (3Shape,
          intraorally. During the gel phase, it was possible to easily remove the   Copenhagen, Denmark) based on the virtual wax-up. The veneers
          excess composite along the cervical shaped area of the silicone key.   were then  milled using a CORiTEX 250i milling machine (imes-
          Once the material had cured, the silicone key was removed leaving the   icore, Eiterfeld, Germany). Finishing was performed using the VITA
          virtually-shaped mock-up on the upper dental arch. The mock-up was   ENAMIC Polishing Set technical. After etching with hydrofluoric acid

                                                             Dental Practice i November-December 2023 i Vol 19 No 6  55