
Page 43 - DP Vol 17 No 4 good
P. 43
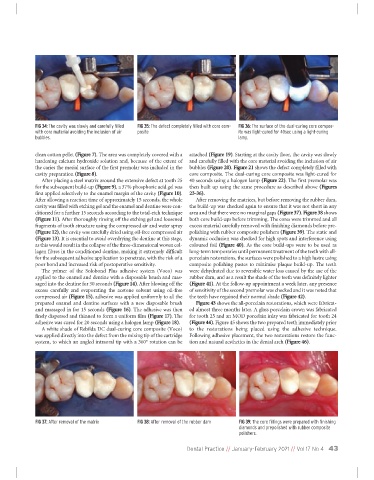
FIG 34: The cavity was slowly and carefully filled  FIG 35: The defect completely filled with core com-  FIG 36: The surface of the dual-curing core compos-
             with core material avoiding the inclusion of air  posite               ite was light-cured for 40sec using a light-curing
             bubbles.                                                               lamp.

             clean cotton pellet (Figure 7). The area was completely covered with a  attached (Figure 19). Starting at the cavity floor, the cavity was slowly
             hardening calcium hydroxide solution and, because of the extent of  and carefully filled with the core material avoiding the inclusion of air
             the caries the mesial surface of the first premolar was included in the  bubbles (Figure 20). Figure 21 shows the defect completely filled with
             cavity preparation (Figure 8).                        core composite. The dual-curing core composite was light-cured for
                After placing a steel matrix around the extensive defect at tooth 25  40 seconds using a halogen lamp (Figure 22). The first premolar was
             for the subsequent build-up (Figure 9), a 37% phosphoric acid gel was  then built up using the same procedure as described above (Figures
             first applied selectively to the enamel margin of the cavity (Figure 10).  23-36).
             After allowing a reaction time of approximately 15 seconds, the whole  After removing the matrices, but before removing the rubber dam,
             cavity was filled with etching gel and the enamel and dentine were con-  the build-up was checked again to ensure that it was not short in any
             ditioned for a further 15 seconds according to the total-etch technique  area and that there were no marginal gaps (Figure 37). Figure 38 shows
             (Figure 11). After thoroughly rinsing off the etching gel and loosened  both core build-ups before trimming. The cores were trimmed and all
             fragments of tooth structure using the compressed air and water spray  excess material carefully removed with finishing diamonds before pre-
             (Figure 12), the cavity was carefully dried using oil-free compressed air  polishing with rubber composite polishers (Figure 39). The static and
             (Figure 13). It is essential to avoid overdrying the dentine at this stage,  dynamic occlusion was checked for high spots and interference using
             as this would result in the collapse of the three-dimensional woven col-  coloured foil (Figure 40). As the core build-ups were to be used as
             lagen fibres in the conditioned dentine, making it extremely difficult  long-term temporaries until permanent treatment of the teeth with all-
             for the subsequent adhesive application to penetrate, with the risk of a  porcelain restorations, the surfaces were polished to a high lustre using
             poor bond and increased risk of postoperative sensitivity.  composite polishing pastes to minimise plaque build-up. The teeth
                The  primer  of  the  Solobond  Plus  adhesive  system  (Voco)  was  were dehydrated due to reversible water loss caused by the use of the
             applied to the enamel and dentine with a disposable brush and mas-  rubber dam, and as a result the shade of the teeth was definitely lighter
             saged into the dentine for 30 seconds (Figure 14). After blowing off the  (Figure 41). At the follow-up appointment a week later, any presence
             excess  carefully  and  evaporating  the  acetone  solvent  using  oil-free  of sensitivity of the second premolar was checked and it was noted that
             compressed air (Figure 15), adhesive was applied uniformly to all the  the teeth have regained their normal shade (Figure 42).
             prepared enamel and dentine surfaces with a new disposable brush  Figure 43 shows the all-porcelain restorations, which were fabricat-
             and massaged in for 15 seconds (Figure 16). The adhesive was then  ed almost three months later. A glass porcelain crown was fabricated
             finely dispersed and thinned to form a uniform film (Figure 17). The  for tooth 25 and an MOD porcelain inlay was fabricated for tooth 24
             adhesive was cured for 20 seconds using a halogen lamp (Figure 18).     (Figure 44). Figure 45 shows the two prepared teeth immediately prior
                A white shade of Rebilda DC dual-curing core composite (Voco)  to  the  restorations  being  placed  using  the  adhesive  technique.
             was applied directly into the defect from the mixing tip of the cartridge  Following adhesive placement, the two restorations restore the func-
             system, to which an angled intraoral tip with a 360° rotation can be  tion and natural aesthetics in the dental arch (Figure 46).


             FIG 37: After removal of the matrix      FIG 38: After removal of the rubber dam  FIG 39: The core fillings were prepared with finishing
                                                                                    diamonds and prepolished with rubber composite
                                                                                    polishers.

                                                                  Dental Practice // January-February 2021 // Vol 17 No 4 43