
Page 3 - Safeview - Cubital Tunnel Booklet - 2019
P. 3
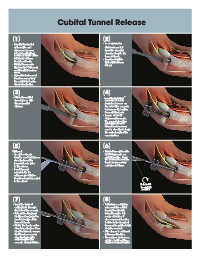
Cubital Tunnel Release


         [ ]                                                    [ ]
                                                                 2
          1
         • Identify the medial                                  • To complete the
          epicondyle and                                         distal release, first
          olecranon process.                                     insert the synovial
          A 2 cm longitudinal                                    elevator deep to the
          incision is made at the                                forearm fascia.
          mid-point of these                                    • Insertion depth is
          bony landmarks.
         • Divide the arcuate                                    typically between
          ligament (of Osborne),                                 5-6 cm.
          and identify the ulnar
          nerve.
         • A proximal release of
          the ulnar nerve may
          be completed under
          direct visualization.
         [ ]                                                    [ ]
          3
                                                                 4
                                                                             ®
         • Dilate the cubital                                   • Insert the SafeView
          tunnel space with                                      cannula. Maintain
          the sequential                                         posterior pressure on
          dilators.                                              the hub of the cannula
                                                                 to preserve its position
                                                                 beneath the fascia.
                                                                • Insert a 4 mm 30
                                                                 degree arthroscope.
                                                                 The cannula is appro-
                                                                   priately positioned
                                                                   when the ulnar nerve
                                                                   can be visualized along
                                                                   the entire length of the
                                                                   cannula floor.

         [ ]                                                    [ ]
                                                                 6
          5
         Optional:                                              • Rotate the rasp handle
         • An optional rasp                                      by 90 degrees to an
          may be used to improve                                 upright position. Rasp
          visualization of the                                   the undersurface of the
          forearm fascia prior                                   fascia to clear away
          to the release.                                        any synovial tissue.
         • Insert the rasp
          superficial to the
          arthroscope with the
          handle oriented parallel
          to the elbow
                                                                                       Rotate 90°
                                                                                       to upright
                                                                                       position

         [ ]                                                    [ ]
                                                                 8
          7
         • Insert the forward                                   • Following a complete
          cutting knife through                                  release of the cubital
          the hub of the cannula.                                tunnel, the elbow is
         • Retract the skin proxi-                               taken through a full
            mally, and engage the                                range of motion. If
            proximal edge of the                                 ulnar nerve subluxation
            forearm fascia.                                      is detected, a transposi-
         • Divide the fascia under                                 tion or epicondylectomy
          direct visualization. Care                               may be needed.
          must be taken to ensure                               • Skin closure is achieved
          that the ulnar nerve is                                in the usual fashion.
          visualized along the                                  • Per surgeon preference,
          entire length of the                                   apply a bulky soft ban-
          cannula during division.                                 dage or long arm splint.