
Page 74 - Tibetan Thangka Painting Methodsand Mat, Jackson
P. 74
The Order of Sketching or flames) and seat for each figure.
When this much of the sketch had been completed
The sequence of sketching in an ordinary thangka it was common for an artist to go back and check the
painting may be summarized as follows. The first step main proportions of each figure. For rapid double-
was the division of the painting surface, and here, as checking some artists compared certain key measures of
already described, one of our informants used ovals to height and breadth of each figure. Lastly, the artist
indicate the places of the main figures. Next the artist surrounded the divine figures with sketches of pleasant
established the lengths of the units of measure to be landscapes or other appropriate surroundings and
used when drawing those particular figures. For a ornamentations. The main features of the standard
Buddha or bodhisattva in a sitting posture the length of landscapes were clouds, mountains, greenery, lakes
one large unit (cha chen) or span worked out at about and waterfalls. The artist drew these working in general
one-eighth of the preliminary oval. For a standing from the top to the bottom of the sketch, and at this
Buddha or bodhisattva the large unit would equal about time he often added some prominent details such as
one-twelfth of the length of the oval. flowers, offerings, auspicious jewels and animals.
When drawing designs that included a main figure
and a surrounding group of lesser figures, a painter had
to establish two scales of measures. From the beginning
he assigned a larger central oval to the main figure and o o
gave the lesser figures correspondingly smaller ovals, o 0
usually from one-half to one-fourth of the length of the
main figure. The artist determined the exact relationship
between these scales of measure according to the
particular exigencies of each composition.
Sometimes the design entailed three or even more
scales of measures: that of a main figure, that of a main
retinue, that of a lesser retinue above or below, and so o o
on. In paintings where the deities had been individually
chosen by the patron or his preceptor, the different
scales of measures usually did not express a priori
hieratic distinctions, but only the main focus and
descending priorities of the particular composition as
determined by the patron or by the lama who originally
advised him to commission the thangka.
In order to establish the values of the main
measures during sketching, the artist usually marked the
actual length of the span (rntho or cha chen) of the main
figure on a splint of wood or bamboo. Often a painter
would further subdivide this homemade "ruler" (thig
shing) into units of six, four, three, two and one sor rno,
since these lengths were needed in constructing the
linear grids or sdom-tshad skeleton lines. The painter 0000
also required separate "rulers" for the lesser scales of
measurement in the design.
The preparation for sketching the main figure
began with the construction of a linear grid - in full or
abbreviated form - to conform with the bodily
dimensions of that deity or guru. For deities with bent
forms, such as goddesses and wrathful figures, the artist
had to fix the angles of the chest and head at an early
stage. Then he could delineate the area of the head with
a rectangle, followed by the drawing of the oval of the
face. Next came the abdomen, followed by the arms
and legs. The sketching of the robes, together with other
garments and ornaments, concluded the initial sketch of
the first figure. After sketching the main figure the artist
proceeded to draw the other figures following the same
basic procedure. Some artists, however, preferred to
sketch all of the measurement grids first, before drawing
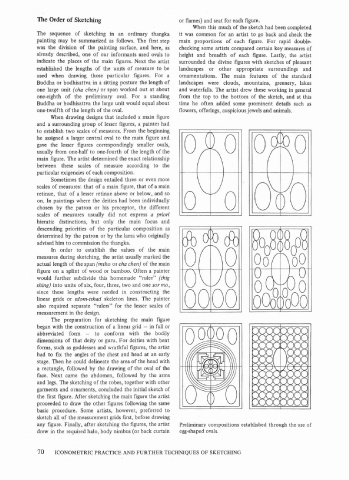
any figure. Finally, after sketching the figures, the artist Preliminary compositions established through the use of
drew in the required halo, body nimbus (or back curtain egg-shaped ovals.
70 ICONOMETRIC PRACTICE AND FURTHER TECHNIQUES OF SKETCHING