
Page 29 - DP1_Spring2019
P. 29
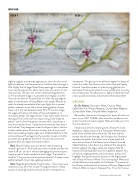
ORCHID STEP 1
STEP 2
 slightly irregular and striated appearance. Let it dry then sand lightly to distress in a few areas to let the black show through a little. Apply the Vintage Notes Stamp sparingly in a few places. I just use the top portion, about two inches or so and I am not neat and tidy. The idea is to create a distressed appearance,
so if the stamped image is incomplete and irregular, it works! If you do not have an ink pad (Staz-on) then use a sponge to apply a small amount of Lamp Black to the stamp. Be sure to wash the stamp immediately after use. Apply this in several places randomly across the surface, leaving plenty of open areas. Let it dry well (approximately 10 to 15 minutes.) Age the edges of the box with floats of thinned Asphaltum. It should just darken the edges a little. Trace and transfer the line drawing of the Orchid to the surface, using Grey Graphite paper. I use an ultra fine gel pen to trace with, it produces a very fine transfer line so I rarely have to erase my lines when I am finished. They disappear under the layers of paint. Let the surface set for about 10 minutes to allow the ink to dry well before proceeding. I apply a light coat of Matte Medium to the entire surface at this stage, but if you prefer to wait until after you erase your graphite, thats fine. You cannot remove the graphite after you apply the matte medium.
Note: Matte medium acts as a barrier coat, protecting everything under it. So should you make a mistake and want to clean it off you can do it without damaging the previous layers. I apply a coat of matte medium at each stage. The benefit is twofold. 1: The previous work is protected and 2: It helps create additional depth (much like a glazing medium).
Note: Regarding the Media Fluid Acrylics... If you have never used them, you are in for a treat! The pigmentation in these acrylics is very high and the colours are semi transparent or
transparent. This gives you the ability to apply thin layers of colour but retain the vibrancy even when they are heavily thinned. I use either water or a fast drying glaze for this technique. Fluid acrylics also dry very quickly and, once dry, do not reactivate. This allows you to apply multiple layers of colour quickly and easily, and provide tremendous depth.
ORCHIDS
On The Palette: Translucent White, Titanium White, Cobalt Teal Hue, Primary Magenta, Quinacridone Magenta, Quinacridone Violet, Diarylide Yellow, Asphaltum.
Remember that we are working in thin layers of colour so don’t try to “GET THERE" all at once. Use small amounts of paint and lots of water or glaze. Relax and take your time. This should be fun!
Shade around the line drawing with a float of thinned Asphaltum. Apply a layer of the Translucent White to each petal of the orchids and to the buds. The lines and the stamps should show through. Let this layer dry. Shade to separate the petals, the center veins of each petal and around the center of the flowers with a float of thinned Cobalt Teal Hue. I also like to put a float of this along the bottom edge of the larger petals too. Apply a float of heavily thinned Asphaltum over the Cobalt to deepen. You will notice a slight greenish cast to the blue...pretty, huh? Highlight the tops and points of each of the larger petals with a float of Titanium White. This is the opaque White and will add definition and solidity to the flowers. The center of the flowers are based with a mixture of Primary Magenta and Titanium White to make an Opaque Pink. This is for the two
DECORATIVEPAINTERS.ORG 27
