
Page 35 - DP1_Spring2019
P. 35
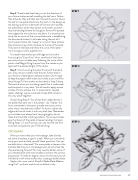
 Step 2: These linked lines help you set the direction of your future strokes as well as adding the leaf veins. Notice that all bends, flips and folds point toward the center where the leaf or rose petal attaches to the stem. In this design we are looking up at the underneath of the rose so the petals are pulled down where they attach to the stem, and then they are bending forward as they grow. Some of the petals have edges that are curled out and down. It is important to study the structure of this rose and take care in establishing the directional strokes. It will make inking the rest of it much easier. Notice the “sweep” or curve of these strokes; they direct your eye from the base to the top of the petal. They start at the base and follow the curve of the petal – not a strong curve but a gentle one.
STEP 1
To create these strokes you will begin at the outline lines using the “Extra Fine” nib or small end of the Identi- pen and pull your strokes away following the curve of the petal or leaf. Begin lifting the pen from the canvas as you approach the desired length of the stroke.
Step 3: Continue using the extra fine end of the Identi- pen, only now you need to hold the pen further back in your hand to create lighter, delicate strokes. Don’t forget to keep the paper towel under your hands as you work the detail inking. Pull the strokes as described in Step 2 above. Notice that when you are inking a petal that is underneath another petal it is very dark. You will need to apply several strokes of ink to achieve this. In areas where I needed darker shading I used a crosshatch stroke ###, similar to this only closer together.
Study Inking Step 3. You will see that I added bends in the petals that were not in the pattern. I do “redraw” the lines; sometimes it is because a stroke went awry and at other times I wanted more ruffles! To do this, redraw the edge and then ink under it with very dark lines. Remember your strokes must always be of varying lengths; do not make them look like marching soldiers. The curved strokes give the illusion of the petals or leaves bending. Compare Inking Steps 1, 2, and 3 and you can see how flat the first ones look compared to your finished inking.
CRITIQUING
After you have inked your entire design, take a break;
eat some chocolate, or go for a walk. When you come back study your work and ask yourself these questions: Can you see definition in the petals? Do some petals or leaves or the bud look like they are in the background; do some look like they are leaning forward? You may need to darken some of your shaded areas with more strokes to achieve the correct perspective. To make an edge or area come forward you will ink behind it with more strokes thus creating a darker shade.
Apply a thin even coat of DecoArt Media Matte Medium using the 1" synthetic wash brush and allow to dry.
STEP 2
  STEP 3
DECORATIVEPAINTERS.ORG 33
