
Page 26 - The Decorative Painter Fall 2016
P. 26
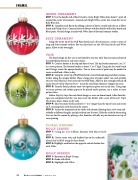
 ENAMEL
 GREEN ORNAMENT
STEP 1: Use the handle end of liner brush to create Bright Yellow dots about 1" apart all around the center of ornament. Around each Bright Yellow center dot, create five or six Baby Blue dots.
STEP 2: Complete each flower by adding a cluster of leaves created with the no. 2 filbert brush and Foliage Green. Connect leaves to flowers with fine bristles of the liner brush and Black paint. Vertical design is made with White lines of dots and comma-strokes.
BLUE ORNAMENT
Using the writer tip of the Puff Paint bottle and a bit of pressure, create a series of long and short comma-strokes. For very fine lines use the 10/0 liner brush and White paint. Allow to dry overnight.
VASE
The floral design on this vase is not limited to one size only. You may mix and match the individual patterns to suit your surface.
STEP 1: Create a border at the top and base of vase. The top border measures 2 to 21⁄2" in a wavy pattern. The bottom border is about 3" to 4" high. Using the sky wash brush and Vintage, create the opaque borders. Two or three coats of paint may be needed to create a solid look. Allow to dry.
STEP 2: Using the writer tip of Puff Paint bottle, create freehand long and short comma- strokes along the opaque border. Place a large piece of paper under vase and sprinkle DecoArt Gold Glamour Dust onto still-wet Puff Paint. Allow to dry overnight. Brush off excess DecoArt Gold Glamour Dust – it may be saved from the piece of paper for reuse. STEP 3: Transfer floral patterns onto vase (patterns given are actual size). Using tape to secure pattern and carbon paper to be placed under pattern, use a stylus to trace pattern lines.
Follow Step-by-Steps for each floral design as seen on demo board. After floral de- signs are completed and dry, you may cover the border with a coat of DecoArt Triple Thick Gloss Glaze. Allow to dry well.
STEP 4: Take two sticks (both need to be 1⁄2" to 1" longer than the top of vase) and create an X, securing them with thread in the center.
STEP 5: Secure the ornaments to the sticks with thread, allowing them to be seen indi- vidually at different lengths, and place them into the vase. Hide the sticks by decorating the vase for the season by placing a few branches of holly or pine branches on top of vase opening.
FLORAL DESIGNS
HOLLY LEAVES
STEP 1: Using no. 2 or 4 filbert, basecoat with Hauser Dark Green.
STEP 2: Create center vein and shadow line on the underside of each leaf in Black using the liner brush.
STEP 3: Highlight each leaf on the opposite side of shadow line with White.
HOLLY BERRIES
STEP 1: Basecoat in Bright Orange. STEP 2: Shade with Black.
STEP 3: Highlight with White.
    24 The Decorative Painter
• ISSUE NO. 3, 2016
DECORATIVEPAINTERS.ORG
