
Page 37 - The Decorative Painter Summer 2015
P. 37
STEP-BY-STEP
ROOSTER
LET’S PAINT
This project was designed for a painting party and taught to people with little to no painting experience in a three-hour time slot. It requires no floating; mul- tiple values and shading are created with a wet-on-wet technique.
BACKGROUND
Measure 5" (12.7 cm) from the right side of the canvas and place a piece of tape along the line. Apply Lamp Black and Zinc in this area using a slip-slap motion of the brush until the area is covered and well blended. You should see varied colors in the background. Let dry.
DECORATIVEPAINTERS.ORG
The Decorative Painter • ISSUE NO. 2, 2015 35
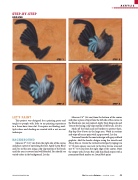
STEP 1
STEP 2
ACRYLIC
STEP 3
STEP 4
Measure 13⁄4" (4.4 cm) from the bottom of the canvas and place a piece of tape from the left side of the canvas to the black area you just painted. Apply Deep Burgundy and Tomato Red using a slip-slap motion of the brush. Let dry.
Mask off the black and red borders to protect them. Slip-slap Raw Sienna in the large area. Work in sections and wipe off excess paint with a paper towel. Let dry.
Trace and transfer the rooster design with gray or black graphite. Add the border designs using the stencils and Honey Brown. Create the vertical red stripes by taping two 1⁄4" (6 mm) spaces: one next to the Raw Sienna area and one 3⁄4" (1.9 cm) from the right edge of the canvas. Paint the stripes with Tomato Red. Add thin black stripes with a permanent black marker or Lamp Black paint.
