
Page 64 - The Decorative Painter Winter 2017
P. 64
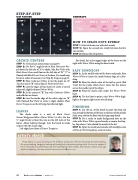
                                                                   STEP-BY-STEP
DEWDROPS
STEP 1 STEP 2 STEP 3 STEP 4
HOW TO SPACE DOTS EVENLY
STEP 1: Start with one row with dots evenly.
STEP 2: Space the second row evenly between the first row of dots.
STEP 3: Repeat the dot pattern.
For detail, line a few jagged edges of the leaves on the right with Warm White using the liner brush.
EASY DEWDROPS
STEP 1: In the middle value of the leaves and petals, float Warm White to create the inside bottom edge of a dew- drop.
STEP 2: Float the shade color of the leaf or petal (Red Violet for the petals, Black Forest Green for the leaves) across the inside top of the drops.
STEP 3: Float the shade color under the Warm White base.
STEP 4: Use the liner to paint a tiny Warm White high- light in the upper right corner of each drop.
FINISHING
STEP 1: Use the no. 20 flat brush to paint the deep teal mix around the bottom of the base so the base of the orchids fades away. Soften the float with the large mop brush. STEP 2: Use a stylus to make background dots on the sides with Warm White, spaced evenly as seen in the Step- by-Step above. I also dotted the inside of the lid.
STEP 3: Spray the inside and outside with multiple coats of DecoArt Finishing Spray, satin or matte.
DOT PATTERN
STEP 1
STEP 2
STEP 3
     ORCHID CENTERS
STEP 1: See basecoat instructions on page 60.
STEP 2: Use the 1⁄4" angle brush to float Dioxazine Pur- ple down the left side of “A” to shade. Mix Red Violet with Black Forest Green and float on the left side of “B.” “C” is floated with Black Forest Green at the base. Use small mop brush to soften if necessary. See Step-by-Steps on page 61. STEP 3: Float Cadmium Yellow to tint the point on “A”. Tint the end of “B” with a float of Watermelon Slice.
STEP 4: Line the edges of box shown to create a turned edge with slightly thinned Warm White.
STEP 5: In the center of “B,” line with Cadmium Yellow and add dots as shown.
STEP 6: Line the inside edge of the white edge on “B” with thinned Red Violet to create a slight shadow. Float Desert Turquoise on the left edge for reflected light.
LEAVES
The shade color is a mix of Black Forest Green+Wedgewood Blue+Warm White (1:1:tch). Use the 5⁄8" angle brush to float this mix on the left sides of the leaves. About halfway though, turn the brush to make stripes with the chisel edge.
Left edges have floats of Desert Turquoise.
 artist’s sketch
       Prudy Vannier cda grew up loving art, but found her real passion when she discovered decorative painting. She enjoys teaching, designing, learning and sharing in the decorative painting world. You can see samples of her art on Facebook as well as keep track of her teaching and travel schedule. She welcomes students of any age and level of painting. You may contact Prudy at prudysstudio@yahoo.com.
         62 The Decorative Painter • WINTER 2017
DECORATIVEPAINTERS.ORG
