
Page 71 - The Decorative Painter Winter 2017
P. 71
your own creativity. I can’t ever do two examples exactly alike, so just relax. It always helps to look up some actual photographic examples of similar ruffled poppies as a reference. I study and analyze numer- ous examples and then proceed with a real poppy in my mind. As all outer edges are floated in with Buttermilk, make sure that all lines the viewer’s eye follows, whether curved, continuous or broken, travel from the outside toward the center, or heart, of the flower. Petals ema- nate outward somewhat like spokes of a wheel or a row of pivoting marchers.
While the poppy under-color dries to allow another layer of color or wash, begin to float in the shape of the second flower, buds and leaves with a mix of Midnite Green+Charcoal Grey (2:1). I make this blend by the bottle, as I find it works great when neither parent color is quite right. Keep your floated color ending softly in toward the center, with a defining outside edge for each petal or leaf. For leaves, it’s always helpful to define the center vein of the leaves, as they al- ways travel in a line, though not always unbroken, from the stem toward the tip of the outermost tip of the leaf. Do not try to make a finished product with a single floated layer. It’s better to go slower in building the shadow color. Perspective comes later!
Once all areas are established and corrected if needed, wash the poppy using thinned Buttermilk with a flat shader. If you have outlined the black fingers, you should still be able to find them lat- er. I pull color from the outside edges in toward the center, just in case some streaking remains. Float light layers of color until hints of background color only remain where a shadow would naturally occur where one petal overlaps or falls behind another. (Forgive that all flowers in the illustrations aren’t identical. I tend to view each as a separate individual.)
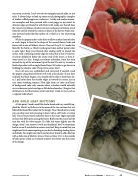
ADD GOLD LEAF SECTIONS
At this point, I used a small flat shader brush and very carefully ap- plied the Metal Leaf Adhesive to the areas of the two sections that rest behind the floated first colors for the design. Once the adhesive is tacky you can drop your leaf, pressing it down with a soft brush or cotton ball. Try not to put excess adhesive close to the outer edges especially in those tiny little spots among the leaves. Buff away the excess leaf the next day with the velvet square. If a little leaf strays slightly into the design, often I can remove it with my thumbnail, but I’ve sometimes had to use an X-acto knife to remove stray leaf. Keep in mind that you might need to do some repairing as you do the finishing shading layers and details. You might note that I used my liner brush to add a fine line with a dark mix of Midnite Green+Charcoal Grey (2:1) to the outside of both spears of leaf, as it seemed to direct the viewer into the center of the design.
DECORATIVEPAINTERS.ORG
The Decorative Painter • WINTER 2017 69
