
Page 66 - The Decorative Painter Summer 2014
P. 66
watercolor
STEP-BY-STEP
uNDERPAINTING
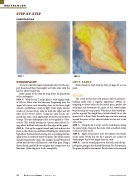
STEP 1
UNDERPAINT
To ensure that the paper remains flat, lay it on the sup- port board and then thoroughly wet both sides with the hake or other wash brush.
Refer closely to the Step-by-Step above for placement of the underpaint.
STEP 1: With the no. 2 script, place a wide zigzag swath of Winsor Yellow over the blossoms (beginning near the upper left corner and extending close to the lower right corner), establishing a path of light. Next, apply narrow swaths of Quinacridone Gold to both the right and left sides of the Winsor Yellow. Using the same brush, sur- round this with a wide application of Quinacridone Burnt Orange. The last underpaint color to be applied is Ultra- marine. This should overlap the Quinacridone Burnt Or- ange about halfway and extend to the edges of the paper. STEP 2: Pick up the support board, and twist and turn the piece so the colors run and blend. Holding the spray bottle high above the board and moving it in a sweeping motion, apply water as needed to move the paint. The yellow center should remain fairly clean. The oranges should blend and soften, and the blue will blend to a soft blue-gray. Using a thirsty brush, gently lift out any gray that creeps on to the blossoms. Allow the piece to dry completely.
STEP 2
LET’S PAINT
Refer closely to each Step-by-Step on page 63 as you paint.
ROCKS
The result of this four-step process will be authentic- looking rocks with a vignette appearance. Before at- tempting to create rocks on the actual piece, perfect the technique and determine the grain of the waxed paper by practicing on scrap paper. Who knew that waxed pa- per has a grain? You might have to look closely to see the grain, but it is there. Paint the rocks one at a time, moving around the piece so that adjacent rocks are not wet at the same time.
STEP 1: Using the no. 2 script, wet the rock shapes. Using the same brush, basecoat the rocks with a medium value of Quinacridone Gold.
STEP 2: Apply Ultramarine over the bottom two-thirds of the rocks. While this sits for a minute, cut a piece of waxed paper that is just larger than the rock.
STEP 3: Lay the waxed paper over the rock, with the pa- per’s grain going in the desired direction. For this project, the grain should be horizontal. Brush clean water around
64 The Decorative Painter • ISSUE NO. 2, 2014
decorativepainters.org
