
Page 50 - The Decorative Painter Fall 2017
P. 50
LET’S PAINT
PUMPKIN
NOTE: Allow drying time between steps. STEP 1: (Not pictured, it is a clear medium)
Paint the entire surface of the pumpkin cutout with DecoArt Americana Weathered Wood Crackle Medium. Use an old wash brush and apply this as thin as you can. It is very thick; therefore, this will take effort.
STEP 2: Apply DecoArt Media Crackle Paint to the en- tire surface of the pumpkin cutout, again using the old brush. Notice in Step 1 of the Step-by-Step on page 47, the thicker you apply the crackle paint, the wider and deeper your cracks will be. Avoid stroking over previous- ly applied crackle paint; it will fill in the beautiful cracks. Look at finished piece. I have a wide variety of sizes and shapes of cracks.
STEP 3: Squirt out a dime-size puddle each of Cobalt Teal Hue and Phthalo Turquoise into the wells of your palette. Fluid acrylics are fluid! They stay contained better in the wells of the Mijello palette. Think of the pumpkin as be- ing divided into 3 sections – these are actually ribs – as you proceed with painting. Dip the no. 24 flat brush into Cobalt Teal Hue and paint the center of one side section. Wipe the brush and pick up Phthalo Turquoise; use this
to shade along the outer
edge, blending as you apply the darker one. Quickly clean and blot your brush then repeat with the other side of the pumpkin. Quickly clean your brush again, blot dry, pick up Cobalt Teal Hue and paint the center of the pumpkin. Shade the sides of the center rib and bottom with Phthalo Turquoise, blending into the Cobalt Teal Hue.
STEM: Squirt out a drop each of Burnt Umber, Titan Buff and Quinacridone Burnt Orange into other wells of your palette. Paint the stem Titan Buff and shade the outer edges and along the left and right of the curl with Burnt Umber, then tint with Quinacridone Burnt Orange.
Apply a layer of DecoArt Media Matte Medium to the entire surface to seal in your paint and create a barrier. I usually mess up the stenciling and this way it is easy to fix or wipe off!
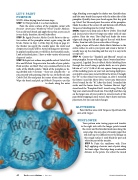
STEP 4: Center the “Thankful and Blessed” stencil on your pumpkin. Secure with tape. Since I wanted my letter- ing raised, I applied DecoArt Black Media Modeling Paste through the stencil using a palette knife, or cut a plastic lid into a 2" x 11⁄2" (5.08 x 3.81 cm) square. Scoop up some of the modeling paste on your tool and using slight pres- sure pull it across your stencil to fill in the letters. I thought the “&” in this stencil was too large, so, after I stenciled the letters I used the Home Décor Americana Motivation Stencil stencil for the “&”. After this dried, I stenciled the swirls and the leaves from the “Autumn Harvest Sign” stencil and the “Pumpkin Patch” stencil using Titan Buff. Tap your small stencil brush into Titan Buff, and then tap on the larger area of your palette to remove much of the paint before tapping in your stencil. Step 4 shows my basic placement, but you can make changes.
GLITTERING
Paint the blue areas with Turquoise Sparkle and the stem with Copper.
SUNFLOWER
Trace pattern onto tracing paper and transfer to the right side with the longer petals toward the center and the foreshortened ones along the outer edge. Use any color of transfer paper that will show up. It is difficult to see the design on this rough surface. I used black for part and
white for part of the transfer.
STEP 1: Paint the sunflower with Titan Buff, applying a heavier coat of paint along the front edges. This helps keep a noticeable division in the petals. Use either the round
48 The Decorative Painter
• FALL 2017 DECORATIVEPAINTERS.ORG
