
Page 76 - The Decorative Painter Spring 2014
P. 76
oil
LET’S PAINT
Carefully review all steps before you start painting. Throughout the piece, use the brush that you are most comfortable with in a
given area.
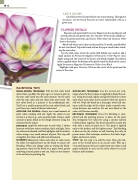
FLOWER PETALS
Basecoat each petal with Permanent Magenta on the outside part and on both sides of each petal’s vein. Use Titanium White on the middle sec- tion of the petals and veins, and Lemon Yellow Hue+tch Titanium White
close to the center.
Blend well where each value touches another. To avoid a muddy effect
do not over-blend. Wipe the brush well on the paper towel before touch- ing the next value.
For the dark value where the petals fold behind one another, add a small amount of Permanent Magenta+Ultramarine Violet+Payne’s Gray. Apply using only the corner of the brush, and blend it lightly. The darkest value is applied where the bottom of the petals touch the body of the cactus.
Apply Permanent Magenta+Ultramarine Violet+Ivory Black.
Highlight with pure Titanium White on the center of the petals and the
center of the veins.
PAINTING TIPS
BRusH-MixinG TECHniQuE: Pull the first color listed down from a puddle. The plus sign (+) means to pick up the next color listed into the same mixture. Do the same with the next color and mix them with your brush. The first color listed in a mixture is the predominant one. You’ll use a smaller amount of the next colors listed, and you’ll use just a touch of the last color listed.
APPLYinG THE CoLoRs: Always use a small amount of paint when working with oils. Apply the colors in one section at a time (e.g., each separate petal). Using a small amount of paint, block in the design elements using the mixtures for the values.
BAsECoAT: Apply the values next to each other. I always basecoat with three values: medium, dark, and light. Once the values are blended, add the highlights and the darkest values using a very small amount of paint. This step will strengthen the values and add more dimension. BLEnDinG: Blend only where each color or value meets the other. Use light pressure on the brush to ensure soft blending. When you change color, or during the blend- ing process, wipe out the brush on a paper towel, gently removing as much paint as you can. Only use the cleaners at the end of your painting day.
WET-on-WET TECHniQuE: Use the wet-on-wet tech- nique when the basic values are applied to blend the col- ors. Using the brush, lightly and gently blend the colors only where each value meets another while the paint is still wet. Wipe the brush on a dry paper towel and con- tinue until the edges of the values make a smooth tran- sition between one another. Do not over-blend or the colors will become muddy.
DRY-BRusH TECHniQuE: Once the blending is com- pleted and the painting process is done, let the piece dry. Strengthen the values by using a circular motion to blend them together. The brush should be nearly dry with only a touch of paint on it. The paint is applied only to the darkest and the lightest areas. The blending is done on the dry surface as well, limiting the value to precise areas. This technique reinforces the darks, high- lights, and accent colors.
TinTs: The last step is to add the tints. They give bal- ance to the overall piece as an accent color. Pick up a very small amount of accent color from one subject, and apply randomly in areas on the other objects to create balance and harmony.
74 The Decorative Painter • ISSUE NO. 1, 2014
decorativepainters.org
