
Page 84 - The Decorative Painter Spring 2014
P. 84
artist’s sketch
Mary Spires tda started her journey into painting while she was recovering from breast cancer. She tells ev- Design is 100% of original.
eryone that cancer was the best thing that ever happened to her. “It made me live one day at a time and find my passion. It’s not about the finished product; it’s about the journey. Enjoy the process—it’s only a piece of paper,” she advises. “Remember—if the painting doesn’t turn out you can always make a gift bag.” Mary has been a member of SDP since 1988. She produces a monthly teaching newsletter with free workbook on color theory, painting projects, and step-by-step videos. Sign up at maryspires.com. If you have any questions, or comments, or just happen to need those gift bag instructions, email Mary at marybspires@yahoo.com.
WATERCoLoR
82 The Decorative Painter
• ISSUE NO. 1, 2014 DEcOrAtIvEPAINtErS.OrG
LET’S PAINT
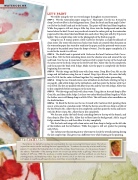
We will be using the wet-on-wet technique throughout to create texture.
sTEP 1: Wet the watercolor paper using the 1" Skyscraper. Use the no. 8 round to drop Coeruleum Blue in the background area. Clean the brush and then apply Cadmi- um Red to the bird’s head and to the berries. The paint will bleed and blend together. While the paper is still wet, drop a little Sap Green into the background and on the leaves below the bird. Do not use your brush to mix the colors; pick up the watercolor paper and let the colors bleed and blend into each other. The paint will dry 30 percent lighter. This is a light value; refer to the photograph of the bird on page 81.
Using the no. 8 round, spatter a little Cadmium Red plus a couple brushloads of clean water. The water will create run-backs (run-backs are created when the paint on the watercolor paper has started to soak into the paper, and the spattered water causes the paint to be pushed away from the drops of water). Dry the paper completely; if it is cold to the touch it is still wet.
sTEP 2: The bird’s head is painted with Cadmium Red and Cadmium Red+Coeru- leum Blue. Wet the bird extending down into the shadow area and around the eye and beak. Use the no. 8 round and Cadmium Red to paint the top of the head and the area next to the beak. Drop in the Red Purple Mix. Allow this to dry completely, and then paint the beak with Indigo. Make sure the paper is completely dry before beginning the next step.
sTEP 3: Wet the wings and belly area with clean water. Drop Blue Gray Mix on the wings and tail feathers using the no. 8 round. Drop Sepia Brown Mix onto the belly area. It’s O.K. for the colors to blend together. Dry completely before proceeding. sTEP 4: Using the no. 8 round create a row of feathers on his back, referring to Step 4 on page 81. Add a little Indigo to the tail feathers, and then paint the berries with Cad- mium Red. The feet are painted with Blue Gray Mix and the eye with Indigo. Allow this to dry completely before moving on to the next step.
sTEP 5: Wet the wings and back with clean water. Using the no. 8 round drop in Blue Gray Mix, and then a little Indigo. Let these two colors bleed and blend together. While the feather area is still damp drop in a little White. This will create a few snowflakes on the bird’s feathers.
sTEP 6: To finish the berries use the no. 8 round with Cadmium Red, painting them one at a time and in a random order. While the berries are still wet, drop in a little of the Red Purple Mix. Allow this to dry completely, and then paint the stems and leaves with the Brown Sepia Mix. Allow this to dry completely.
Wet the area under the bird’s head, extending down to the top of the branch, and then drop in Blue Gray Mix. Allow this to bleed into the background. Add a ring of Indigo around the eye, and then allow it to dry completely.
Wet the back and wings with clean water, and then drop in Indigo on the left side of the feathers and the tail feathers. While the paper is still wet spatter the painting with White.
Tip: I always put the painting into a white mat to check the overall painting during the last couple steps. This gives you a different view, while framing in the painting.
