
Page 74 - The Decorative Painter Spring 2016
P. 74
ENAMEL
Next place the clock on top of more contact paper to adhere to the bottom
or back side of the project.
Now that your surface is pro-
tected from where you do not want it etched, you are ready to apply the etching crème. If you get some on your hands or fingers, do not worry. It will not hurt you! However, do keep it away from your eyes. Using the plastic squeegee, generously pour some of the crème from the jar, and spread it evenly (thick coat) around the open glass area to be etched. Allow this to stand for 15 minutes or longer. After the time is up, reclaim the crème back to the original jar for reuse on anoth- er project. Then wash the excess crème off the surface and dry. Do not remove the contact paper until after you have cleaned
off the excess crème.
Now prepare for the paint-
ing, and clean up all traces of etch- ing crème from your work area.
LET’S PAINT
The glass glossy paint we are using is a du- rable enamel paint which, after it is dry, can be baked directly in the oven for 30 minutes and will then be dish- washer safe and pretty much scratch-free. It is also safe to
use on dinner plates.
Apply basic patterns to the etched glass surface by one
of two methods. Method 1: Place the pattern underneath the surface. You can see the pattern through the etched glass well enough to use the sharp pencil on top of the etched surface. Method 2: Transfer the patterns using
your double-ended stylus with grey graphite slipped un- der the pattern on the top-side of the surface.
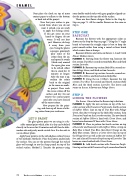
There are four flower designs. Refer to the Step-by- Step on page 71. All the smaller flowers are the same as Step 4.
STEP ONE
BASECOAT
Basecoat the flowers with the appropriate colors as shown on the Step-by-Step on page 7. Using the 3⁄8" angle brush to basecoat the straight edges is best to keep the paint smooth rather than using a round or liner brush which creates lines or bumps.
Basecoat all leaves and stems on flowers 1, 2 and 3 with Hauser Medium Green.
FLOWER 1: Starting from the flower top, basecoat the first section True Blue; second section Baby Blue; and third section Lavender.
FLOWER 2: Basecoat top section Baby Blue; second sec- tion Foliage Green; and third section Lavender.
FLOWER 3: Basecoat top section Lavender; second sec- tion Saffron Yellow; and third section Baby Blue. FLOWER 4: Using the no. 6 filbert, basecoat the top section True Blue; the second and fourth sections Baby Blue; and the third section Lavender. The leaves and stems on the no. 4 flowers are Foliage Green.
STEP 2
LINING THE FLOWERS
Use the no. 1 liner to line the flowers top to bottom. FLOWER 1: Apply the new sections on top of the Lav- ender section with Dioxazine Purple and a fourth section of Saffron Yellow. Line on top of True Blue with Foliage Green, then Burnt Orange on the Baby Blue section, then Dioxazine Purple on the Lavender section. The new fourth section of Saffron Yellow is lined with Citron Green, and leaves have downward V lines with Citron Green. FLOWER 2: Place in pattern for fourth section on top of Lavender and basecoat it with Saffron Yellow. At top on Baby Blue is lined True Blue, then Burnt Orange on the Baby Blue section. There is a Citron Green line on top of the Foliage Green as well as the new section of Saffron Yel- low, and a line of Dioxazine Purple on top of Lavender. The leaves are cross-hatched with Citron Green.
FLOWER 3: Add fourth section with Dioxazine Purple. Line top section with Dioxazine Purple, second and fourth
72 The Decorative Painter • ISSUE NO. 1, 2016
DECORATIVEPAINTERS.ORG
