
Page 60 - The Decorative Painter Winter 2015
P. 60
WATERCOLOR
Painter’s Checklist
SURFACE
11" x 15" (4.3 x 5.9 cm) Arches 140-pound watercolor paper
PALETTE
MISSION GOLD OR WINSOR & NEWTON
WATER COLOURS Burnt Sienna
Ivory Black
Lilac or any Light Pink Payne’s Gray
Raw Sienna
Designers Gouache Permanent White
BRUSHES
Synthetic Blend brushes
SILVER BRUSH, LTD. BLACK VELVET Series 3008S 1⁄2, 3⁄4 & 1" flat wash Series 3000S nos. 2, 6 & 8 round Series 3007S no. 1 script liner Toothbrush or your favorite spritzing tool
SUPPLIES
Basic painting supplies (page 96) A sturdy non-porous work surface
(larger than your paper) Water color palette
Water containers (2) Absorbent paper towels No. 2 pencil
Red or green ballpoint pen Graphite transfer paper White eraser
X-acto knife
Acid free tape or blue tape
SOURCES
For a complete line of art supplies including Arches 140-pound watercolor paper, Mission Gold or Winsor & Newton water- colors, and Silver Black Velvet brushes,
visit www.dickblick.com.
58 The Decorative Painter • ISSUE NO. 4, 2015
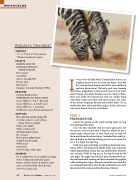
Iwas so very thrilled when I learned that there is an elephant preserve not far from my home. One day last year, our local chapter decided to take a field trip and do a photo shoot. We had a great time learning
about these magnificent creatures and some of their other exotic friends. Two of my favorites were the Grant's zebras, Piere and Tache. We learned that they are neither black with white stripes nor white with black stripes. The color of the zebra’s stripes go directly into his/her hides. So, in reality, they have white and black stripes. In fact, these two were more brown then they were black.
STEP 1
PREPARATION
Center the pattern on the paper leaving room to crop your painting when done.
Trace the lines carefully with the red or green pen, but do not use excessive pressure. I found it helpful to put a couple light vertical lines in each black area to help tell them apart from the white stripes. I extended the necks fur- ther up than is on the line drawing just in case I wanted to put it in a larger mat opening.
Study your piece and make sure all lines have been trans- ferred. With a soft lead pencil, lightly shade each stripe that will be painted black so that you can identify them when we start to paint. (Refer to step one in the Step-by-Step on the next page.) You might want to put a piece of paper towel un- der your hand while working so it does not smear the graphite while marking the stripes. This may seem like extra work, but you will appreciate it later. Also, it helps to familiarize you with the contour of the animal and the direction of the fur.
DECORATIVEPAINTERS.ORG
