
Page 62 - The Decorative Painter Winter 2015
P. 62
LET’S PAINT
Refer to the Step-by-Step on page 59 as you paint.
With clean water, make a large puddle of Raw Sienna, and a smaller puddle of Burnt Sienna and Payne’s Gray.
With clean water, wet the entire piece of paper. It should have a sheen. Check to make sure it is entirely wet. If not, wet it again; do not leave any puddles.
STEP 2
BACKGROUND, FIELDS AND TREES
When the sheen leaves the paper, work a medium wash of Raw Sienna over the background and front field area, leaving some of the wash to go into both ears of the right zebra, and into the nose of both zebras as well as between the two necks.
Add deeper Raw Sienna to the tree line and the shaded areas in the field. Add some Burnt Sienna to these areas also. While the paper is still wet, scratch tree branches in the tree line, but not the large tree.
Darken the Burnt Sienna area between the two zebras necks and have a Burnt Sienna glow above the right zebra’s mane.
STEP 3
After scratching the branches in the tree line, go over these areas with a Burnt Sienna wash. Add some Payne’s Gray to the Burnt Sienna to make a dark- er brown, and add this color to the tree line and in some of the grass areas. Let the tree line bushes dry.
Using a liner brush, paint in the larger tree with Burnt Sienna+Payne’s Gray mix. Add some Burnt Sienna to the base of the tree. Add a few leaves in the tree. Tap with a wet paper towel to soften the foliage. Add blades of grass in the field, but do not do the foreground around the zebras’ mouths at this time. Note: The highlight on the left side of the tree will be added later. Let everything dry.
STEP 4
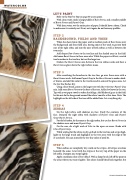
ZEBRAS
On the right zebra, add shadows on face. Study the contours of the face. Dampen the right zebra with shadows of Payne’s Gray and Payne’s Gray+Burnt Sienna.
For the left zebra, do the same as the right zebra, but use less Burnt Sienna in the shadow areas and more Payne’s Gray.
On the ears, do a light wash of Lilac in the open ear areas. Shade with Lilac+Payne’s Gray.
While waiting for the zebras to dry, go back to the tree line and scrape high- lights in the large trunk and highlights in the tree areas with the edge of the X-acto knife. You can intensify the tree line colors if need be.
STEP 5
When zebras are completely dry, work on the stripes. All stripes are done basically the same. I start with the stripes at the very top of the paper on the left zebra. Dampen one stripe lightly.
Apply a medium color of Ivory Black. With a damp brush, lift off the paint in the areas where you want it lighter. The colors should blend back together, but
DECORATIVEPAINTERS.ORG
WATERCOLOR
