
Page 68 - The Decorative Painter Winter 2015
P. 68
ACRYLIC
LET’S PAINT
BASECOAT
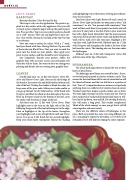
Basecoat the plate Calico Red and let dry.
This step is a dry-on-dry application. The paint is ap- plied to a dry surface with a dry applicator. First you will crumple a piece of palette paper and tap the palette paper into Prussian Blue. Tap it on your palette and you should see a “stiff ” texture. Now you can apply this to your sur- face. This will be a bit harsh, but look at the Step-by-Step as a reference.
Now you want to soften the colors. With a 1" wash, load your brush with Faux Glazing Medium. Tip one side of the brush into Black Plum. Next you want to work the paint into the brush on your palette. Then apply your paint to your surface, and this should be very transparent.
Dry completely. Transfer your pattern. Soften the graphite lines with an eraser so you can easily paint over them but still see them. You want to focus on seeing your painting and details, not on covering your graphite lines.
LEAVES
Double load your no. 12 flat with Hauser Green Me- dium and Hauser Green Light. Start on the chisel edge of the brush at the center vein and build strokes to form each side of the leaf. Overlap the strokes to blend the color, yet keep some of the pure color. Make your stroke smaller as you go up the leaf. Let dry. Side load no. 12 flat brush with Evergreen and float the shade on the dark side of the vein. Float an Evergreen shade on the bottom of the leaf, carry the stroke with the form or shape of the leaf.
Side load your no. 12 flat with Citron Green. Float highlights next to the vein on the light side of the leaf, following the growth of the leaf softening out to the edge. Float in highlights at the tip of the leaves. Strengthen your highlights with a mix of Light Buttermilk and Citron Green. Use an no. 8 flat brush for the second highlight. Keep your floats fairly transparent. Repeat the shading
and highlighting two or three times to bring more dimen- sions to your leaves.
Load your liner with Light Buttermilk and a touch of Hauser Green Light and make sure your paint is of an “ink consistency” or of a “two percent milk consistency.” Line work will not easily flow if your paint is too thick, and will not cover if your paint is too thin. Paint in your main vein line with a light touch. Remember that the more pressure you put on the brush the heavier, wider and darker the line work will be. Add a few side vein lines. Highlight a few vein lines with Light Buttermilk. Sideload your no. 12 flat with Evergreen and strengthen the shade at the base of the leaf were the vein is. This shading also sets the veins under the hydrangeas.
Sideload your no. 8 flat with transparent Calico Red and tint some of the tips of the leaves.
HYDRANGEA
The whole hydrangea flower is formed by two or three layers of petal forms.
The hydrangea petal forms are created by four-, three-, or two-leaf petals painted in clusters to form a circle. That means the four-leaf form will be sort of round and so will the three leaf forms, and the two leaf form is a portion of that. “Sort of ” is important because nature is not perfectly anything; there is a subtle level of creative chaos in nature. We don’t want these shapes in perfect order, size, or form. We want slight variation in form, shape and size. Now to form each petal of each petal formation load your no. 6 fil- bert, lay the tip down, turn and lift. Do not drag the brush, this will make a long petal. This sounds complicated. Think of the whole concept, as once you get that it will all come together and move nicely.
There are two different colors of hydrangeas in this piece. Both are painted the same way using different col- ors. I am going to repeat the directions, so it will be a bit redundant, but it will help in keeping the colors separate.
