
Page 46 - The Decorative Painter Winter 2016
P. 46
METALLIC/POWDER
STEP-BY-STEP
FLORAL DESIGN ON TOP
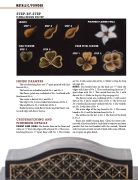
LEAVES STEP 1
HALF FLOWER STEP 1
POINTED FLOWER PETAL
FOUR PETAL FLOWER STEP 1 STEP 2
are No. 2 with center dots of No. 6. (Refer to Step-by-Step on page 45.)
BACK: The border lines on the back are 1⁄2" from the edges with lines of No. 2. The crosshatching lines are 1" apart done with No. 1. The curved lines are No. 1 with dots of No. 6. (Refer to Step-by-Step on page 45.)
The flower petals are a sideload of No. 1 with center dots of No. 6 and a couple dots of No. 5. The leaves are No. 3 outlined and center-stroked with No. 2. The tendrils are No. 2 with dots of No. 6.
The outer edge of the top board is No. 1. The center board is No. 2, and the bottom board is No. 3.
The outline on the feet is No. 2. The front of the knob is No. 2.
Erase any visible tracing lines. Clean the entire cabi- net with a lint-free cloth or tack cloth to remove any loose powder that has not bonded with the varnish. Varnish with two coats of satin varnish. Finish with coats of brush- on or spray-on gloss finish.
INSIDE DRAWERS
STEP 2
STEP 2
STEP 3
The crosshatching lines are 1⁄2" apart painted with fine lines of No. 1.
The leaves are a double-load of No. 1 and No. 2.
The flower petals are a sideload of No. 6 outlined with fine lines of No. 6.
The center is dots of No. 5 and No. 6.
The tulip is No. 3 over-stroked and stamens of No. 2. The tendrils are No. 2 with dots of No. 6.
Shade the leaves with Burnt Umber and the flower cen-
ter and tulip with Burnt Sienna. CROSSHATCHING AND
FINISHING DETAILS
FRONT AND SIDES: The border lines on the front and sides are 1⁄4" from the edges with a line of No. 2. The cross- hatching lines are 1⁄2" apart done with No. 1. The strokes
