
Page 46 - The Decorative Painter Spring 2018
P. 46
ACRYLIC
Painter’s Checklist
SURFACE
Free-standing desk frame 11" x 11" (27.9 x 27.9 cm)
PALETTE
DECOART AMERICANA ACRYLICS Bleached Sand
Brandy Wine
Charcola Grey (Optional)
Light Avocado
Midnite Green
Plantation Pine
Shale Green
Snow (Titanium) White
DECOART DAZZLING METALLICS Splendid Gold
BRUSHES
LOEW-CORNELL
Series 7300 nos. 2, 4, 6, 8 & 10 flat shaders Series 7350 no. 1 liner
Series 2014 nos. 4 & 6 round scumbler
SUPPLIES
Basic painting supplies (page 96) Dry-It Board
Foam sanding block or fine sandpaper Masterson Sta-Wet Painter’s Pal Palette Palette Paper that has soaked
for several hours in water Sponge, 1" square
Stylus
Tack cloth
Viva paper towels
White Super Chacopaper Your favorite varnish
SOURCE
The Free-standing desk frame (Item no. 20-11146), White Super Chacopaper by Loew-Cornell (Item no. 85-0741) and Dry-It Board (Item no. 99-7357) are available from Viking Woodcrafts; 1-800-328-0116; vikingwoodcrafts.com.
44 The Decorative Painter • ISSUE NO. 2, 2016
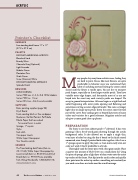
Many people shy away from realistic roses, feeling they are hard to paint. Roses, like most flowers, are quite predictable in behavior once you understand their habit of unfurling outward leaving the center coiled
closed until the flower is totally open. You are free to interpret petal shapes, especially on those larger outside petals. They have variable outer edge shapes, and fortunately most of us are not keyed into the exact way each variety’s petals are shaped. We accept a general interpretation. All roses begin as a tight bud and unfurl beginning with outer petals opening and flattening and sometimes curving as outer edges roll under. This casts a stronger light value on larger open petals’ down the center, most forward part of the curve. Rose catalogs give us beautiful pictures of many colors and varieties for a good reference. Magazine articles and ads give us more good close-up photos.
PREPARATION
The frame is cut from cabinet-grade 1⁄2" plywood. It has even graining; I like a bit of wood grain showing through the acrylic background color. It also allowed me to apply a single thin, even layer of color by using the dry-it board so the finish stayed unmarred, even though I painted both sides together. Also I use a 1" sponge square to apply the paint, as I can more easily even out color as I work. I find it preferable to a brush.
Thoroughly sand the entire piece with a fine grain sander. Place a quarter-size amount of Shale Green on a small plastic lid. Using the piece of sponge, place a light layer of clean water onto the entire top surface of the frame. Next dip into the acrylic color and quickly draw paint over the entire top surface, smoothing out constantly as you work so no lines or streaks mar the overall coverage.
DECORATIVEPAINTERS.ORG
