
Page 83 - The Decorative Painter Spring 2018
P. 83
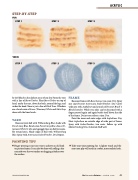
 YARN STEP 1
STEP 2
STEP 3
ACRYLIC
  STEP-BY-STEP
FUR
STEP 1
STEP 2
STEP 3
  by Soft Black in the darkest areas when dry. Form the eyes with a line of Burnt Umber. Float Burnt Umber on top of head, under the ears, down the back, around the legs, and under the head. Nose is just a line of Flesh Tone. Whiskers are a brush-mix of Snow (Titanium) White and Slate Grey done with the liner brush.
YARN
Basecoat yarn ball with Williamsburg Blue; shade with French Grey Blue. Brush-mix French Grey Blue+Snow (Ti- tanium) White (1:tch) and squiggle lines on ball to resem- ble wound yarn. Shade edges of ball with Williamsburg Blue. Spray with Americana Sealer/Finisher. Dry. Repeat.
PAINTING TIPS
n Finger pressing is just one way to achieve an old look on picture frames. It can also be done with rolling a dry corncob over the wet surface or dragging a feather over the surface.
FRAME
Basecoat frame with Raw Sienna, two coats. Dry. Spray one coat DecoArt Americana Sealer/Finisher. Dry. Cover wide area with Asphaltum and a touch of DecoArt Brush ’n Blend Extender. While wet, sides can be decorated with a finger pressed again and again beside itself down the side of the frame. Do just one side at a time. Dry.
Paint the inner and outer edges with Asphaltum. Dry. Float Asphaltum on outside edge of wide part of frame. Spray with Sealer/Finisher, two coats. Follow up with Matte Finishing Wax, if desired. Buff well.
n Take your time painting fur. A lighter touch and the more you play will result in a softer, more realistic look.
 DECORATIVEPAINTERS.ORG
The Decorative Painter • ISSUE NO. 2, 2016 81
