
Page 32 - The Decorative Painter Fall 2015
P. 32
ACRYLIC
ETCHING INSTRUCTIONS
Wash and dry all glass pieces before you start. Tear 6" pieces of the 1" green tape. Place a band of tape all the way around the bottom (straight section) of the cheese dome then add two more rows of tape. Due to the contour of the dome, use the 1⁄4" green stretchy tape to complete taping; this tape will allow for slight stretching in order to keep a straight line without wrinkles above the third row. (Hint: Etching crème can seep into the tiniest of wrinkles.) Place another band of the 1" green tape, overlapping the stretching tape. Remove the second and third rows of tape, using this tape to cover up the top of the dome. Use more if needed.
Put the dome on the foam plate. Use the detail pick to trace the outside of the dome, punctur- ing the plate. Use scissors to cut the excess tape. Tape the foam dinner plate to the bottom of the dome. At this point, you have covered all parts of the dome you don’t want to etch.
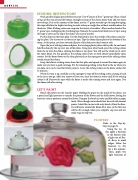
Open the jar of etching crème and place the two large plastic plates side by side. In one hand, hold the dome by the top over one of the plates. Using your other hand, pour the etching crème from the jar onto the dome, rotating the dome as you pour. You will use the whole jar to cover the entire dome. Do this quickly as the etching crème starts to work almost immediately upon contact. Set the dome down on the clean plate and use the squeegee to spread the etching crème evenly around the dome.
Scrap the leftover etching crème from the first plate and spread it around the dome again to make sure you have a good coverage. Put the remaining etching crème back in the jar when you are done so it can be used for future projects. Leave the etching crème on the dome surface for 15 minutes.
When the time is up, carefully use the squeegee to wipe off the etching crème, putting it back in the jar as you go. After you remove all you can, rinse the dome in water until all the etching crème is off. Remove the tape while the dome is under the running water and rinse again. Dry the dome well after rinsing.
LET’S PAINT
Sketch the pattern on the transfer paper. Holding the paper on the inside of the dome, use a pencil and light pressure to transfer the pattern of the flower and the holly leaves, having the leaves in various positions around the flower. Dampen the brush in water and blot off on a paper
towel. (Even though water should not be used with enamel paints, I don’t like to start with a dry brush.) Paint the flow- ers and leaves around the dome all at once so the first one will be dry enough when you complete step one and are ready to go to step two.
FLOWERS
Refer to the Step-by- Step on page 29.
Using the no. 12 flat, apply a basecoat to the flowers with a light coat of Raz- zle Berry to avoid ridges. Allow the basecoat to dry for a few minutes. Then, apply two light basecoats of
30 The Decorative Painter
• ISSUE NO. 3, 2015
DECORATIVEPAINTERS.ORG
