
Page 68 - The Decorative Painter Fall 2015
P. 68
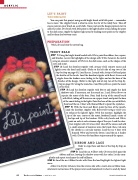
  ACRYLIC
 LET’S PAINT
TECHNIQUE
You can paint this project using an old bright brush with little paint — remember less is more. The stippler brush is ideal to create the fur of the teddy bear. Take off excess paint on your brush on a soft cloth. Once you have the design painted, start to add your color. Dry brush with little paint in the light shadow areas, pulling the paint to the dark areas; stipple the lightest light areas by loading more paint on the stippler and let them dry between coats.
PREPARATION
Wash, dry and iron the cotton bag.
TEDDY BEAR
STEP 1: Using the bright brush loaded with White, paint the ribbon, lace, square, and brushes. Accent the highlights of the design with White; however, be careful using an excessive amount of White in the dark areas, such as the shapes of the
eyes and snout.
STEP 2: Load the deerfoot stippler with Antique Gold, remove excess and
lightly cover the head and hands. (Refer to the left side of step two of the Step-by Step on page 65.) Load the no. 2 round with Antique Gold and paint the bristles of the brush. Load the deerfoot stippler with Burnt Sienna and stipple from the shadow areas, fading to the lights and on the base of the brushes of the design. (Refer to the right side of step two of the Step-by- Step on page 65.) Using the round no. 2 and Honey Brown, paint the snout
of the bear.
STEP 3: Load the deerfoot stippler with Brown and stipple the dark
shadows only. If necessary, use the round no. 2 and Honey Brown to repaint the snout of the bear. Next, load the tip of the round brush with Black, taking off the excess on a paper towel, and paint the base of the snout fading to the lights. Paint the base of the eyes with Black,
then load the no. 0 liner with thinned Black to paint the eyelashes. STEP 4: With the liner and Black, paint the line of the mouth. Load the deerfoot stippler with Buttermilk+Antique Gold (2:1) to enhance the lightest lights. With this mixture, highlight the tip of the ears, center of the snout, forehead, hands, center of the lips and tip of the brushes. With a dry brush and White, paint an arch at each extreme edge of the eyes. Load the deer- foot stippler with Christmas Red, take off the excess and add a small amount of moisture onto the brush; then, rub onto the cheeks in a circular motion. Load the no. 0 liner with thinned White and write the letters. Load the no. 4 shader
with Christmas Red and base stripes around the square.
RIBBON AND LACE
Refer to steps three and four of the Step-by-Step on page 65.
STEP 3: Load the no. 6 filbert with Christmas Red; paint the ribbon and lace, leaving the shadow areas with less color. Let dry com-
pletely and repeat to enhance the red brilliance.
STEP 4: Load the no. 6 filbert brush with Neon Red and highlight the lightest light areas.
Allow it to dry for 24 hours. Iron the reverse side with a warm iron or follow man- ufacturer’s instructions. If the project ever needs laundered, it is best to wash by hand.
 66 The Decorative Painter
• ISSUE NO. 3, 2015 DECORATIVEPAINTERS.ORG
