
Page 45 - The Decorative Painter Summer 2017
P. 45
STEP-BY-STEP
STEP 1
STEP 2
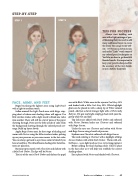
FACE, ARMS, AND FEET
area with Black. White areas in the eyes are Cool Grey 10% and shaded with a little Cool Grey 30%. White highlight glints can be placed in with a sharp tip of White colored pencil. Add just a dot of stronger light with a White Gelly Roll pen. If it gets too bright simply go back with your fin- gertip while wet and dab.
Top lashes are added with Dark Umber and softened with Nectar. Bottom lashes are Chestnut and softened with Beige Sienna.
Under the eyes use Chestnut and soften with Nectar and Beige Sienna using a breath of pressure.
Eyebrows are Chocolate softened with Beige Sienna.
The neck coloring is Chestnut with a highlight of Beige Sienna. Darken with a little Dark Umber. Warm with a lit- tle Henna – use a light touch as it is a very strong pigment.
Before adding the final shading colors I like to place in the hair color as it will help you establish the correct shading values.
Ear is placed with Nectar and shaded with Chestnut.
Begin by placing the lightest areas using Light Peach with a light to medium touch.
Soften around the Light Peach areas with Beige, stop- ping short of where next shading values will appear. Use little circular strokes with a light touch to blend one value into another. There will still be a lot of pores of the paper showing through. Pores are the little specks of color from the background showing through the colored pencil cov- erage. Build up layers slowly.
Apply Beige Sienna next for first stage of shading and warm with Nectar using the little circular strokes, picking up on your pressure as you come nearer to the last color. You can always go back to a previous color to blend if you have a hard line. We will add more shading after facial fea- tures are placed in.
Basecoat open mouth with Chocolate and darken with a little Dark Umber. The lips will be Nectar.
The iris of the eye is Dark Umber and darken the pupil
DECORATIVEPAINTERS.ORG
The Decorative Painter • SUMMER 2017 43
TIPS FOR SUCCESS
Always start building each area with a light coverage of pen- cil knowing that you need to add many additional layers to create the detail. You can go to my web- site, www.paulaleopold.com, and under “Links” watch some of my colored pencil techniques on YouTube on how to get beautiful blended results. It is important to keep your pencils sharpened for the accuracy of the tiny details, so use a battery sharpener.
