
Page 85 - The Decorative Painter Summer 2017
P. 85
LET’S PAINT
STEP 1: Prepared the background, sprayed with Krylon Matte Finish as detailed on page 81.
STEP 2: Tranfer the inked design to the painting surface. Carefully follow instructions as detailed in “Transferring the Design” on page 81. Note the use of the all-impor- tant tracing paper overlay so that you can tell how exact you are duplicating the pattern and what parts you still haven’t done.
STEP 3: When finished remove all layers of materials from surface. Put dark graphite away, tuck original pattern out of the way and keep the tracing paper overlay sheet handy for steps. Remember, a perfect transfer goes a long way toward a perfect finished painting.
STEP 4: Using the no. 2 bright, basecoat sections of wing as shown with a mix of Cadmium Yellow Pale+ Winsor Red loading last in the Winsor Red to give a slightly richer orange.
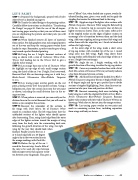
STEP 5: Lay orange base mix+a bit of Titanium White for highlight on top edge of each small orange section using the chisel of the no. 0 or 2 bright. Don’t overwork. Basecoat Dark Mix on forewings using no. 4 with Ivory Black+French Ultramarine Blue+Phthalo Turquoise (1:1:1).
STEP 6: Lay tracing paper overlay gently on the wet paint, placing evenly over the painted sections. Using a ballpoint pen, draw the section lines into the wet paint as shown, including the small division lines in the or- ange sections.
STEP 7: When pattern is removed, you can easily see the division lines in the wet oil basecoat that you will need to follow as you complete the sections.
STEP 8: Basecoat the remainder of the sections in for wings with Dark Mix+a bit of Titanium White mixed to a medium value. The left wing shows how the unblended sections of the lighter value should appear after basecoating. Then, using chisel edge blend the outer edges of the lighter sections toward the margin of wing away from the body, into the surrounding dark mix, following the growth direction of the wing. See right wing for the way they should look when
finished. Finally use your best no. 2
or 4 chisel edge held at a 45-degree
angle to lay in the two section lines in
the orange markings with Dark Mix. STEP 9: Flatten the tip of the no. 1 round for the next step. Load a little of the mix to be used, dry-wipe between folds of paper towel, then squeeze to flat- ten between your fingernails. This gives a
sort of “filbert” that, when loaded into a sparse, evenly dis- tributed loading zone, gives a very useful tool to apply the stippling that creates the iridescent look to the wing.
STEP 10: Stipple on top of the lighter value sections with Phthalo Turquoise+Titanium White using the flattened tip of the no. 1 round to tap in successive rows of dots on lighter sections as shown. Then, in the same, soften a few of the stippled strokes on the edges of lighter sections to encourage a bit of transition between them and the dark wing. Add some stippling on long sections (left wing) and soften those with the wiped dry no. 1 brush to blend and soften a bit (right wing).
At the outer edge of the wing, make a short series of zig-zag strokes with rounded tip of the no. 1 round using same mix (left wing). Right wing shows those zig-zag strokes softly blended, with chisel edge of the no. 0 or no. 2 bright (see next image).
STEP 11: Angle the no. 2 bright, working with the growth direction of the wing, to soften the zig-zag strokes. STEP 12: Cover any unneeded section lines with a bit of Dark Mix+a hint of Titanium White to just barely indicate a few faint divisions between sections.
STEP 13: Add chisel lines of sparsely loaded Ivory Black+ Phthalo Turquoise using your best no. 4 bright. Hold brush at 45-degree angle and tap to get a perfect line to divide sections of stippled highlighting. Neat, clean lines are im- portant so take your time and practice a bit first.
STEP 14: Basecoat remaining dark areas including the body using no. 4 with the original Dark Mix of Ivory Black+ French Ultramarine Blue+Phthalo Turquoise. Basecoat lighter value sections with Mix+tad of Titanium White as on forewings. Work close to, but not into, the orange sections. STEP 15: Lay tracing paper overlay on wet paint and mark in remaining section lines, including separation from wings and body, as shown.
DECORATIVEPAINTERS.ORG
The Decorative Painter
• SUMMER 2017 83
