
Page 77 - The Decorative Painter Summer 2018
P. 77
STEP-BY-STEP
SHOES
STEP 1 STEP 2
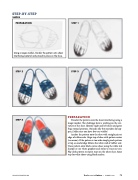
PREPARATION
Using a magic marker, transfer the pattern onto sheer interfacing material and pinned in place on the shoe.
STEP 1
STEP 3
STEP 2
STEP 3
PREPARATION
Transfer the pattern onto the sheer interfacing using a magic marker. The challenge here is working on the cur- vature of the shoe. Identify right and left shoes and great (big) toenail position. (Sounds silly but mistakes do hap- pen.) Make sure you have five toes visible!
Anchor the pattern onto the shoe with straight pins at edge of rubber sole. Align top of shoe with pattern center (see arrow). If the pattern is too wide simply pinch pattern at top so sandal edge follows the white wall of rubber sole. Trace pattern onto black canvas shoes using the white ink sharpie or use white graphite and stylus to trace on toes. Flip cloth pattern to repeat steps on the other shoe. Same step for white shoes using black marker.
STEP 4
DECORATIVEPAINTERS.ORG
The Decorative Painter • SUMMER 2018 75
