
Page 79 - The Decorative Painter Spring 2017
P. 79
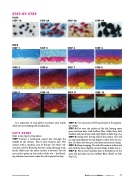
STEP-BY-STEP
FELTS STEP 1A
INKS STEP 1
STEP 5
STEP 9
STEP 2A
STEP 2
STEP 6
STEP 10
STEP 3A
STEP 3
STEP 7
STEP 11
STEP 4A
STEP 4
STEP 8
STEP 12
                It is important to wear gloves to protect your hands while you are working with alcohol inks.
LET’S PAINT
Refer to the Step-by-Step above.
STEP 1: Draw a horizontal pencil line through the middle of the surface. This is your horizon line. Wet surface with a medium coat of Ranger Tim Holtz Ad- irondack Alcohol Blending Solution using the large wash brush. Make sure the entire surface is covered. You do not need to paint on the surface while wet – the blend- ing solution reactivates when the ink is placed on top.
STEP 2: Cut out a piece of felt and attach to the applica- tor stamp.
STEP 3: Dot over the surface of the felt, leaving some space between dots, with Sailboat Blue. Make these dots random and you do not need a lot! (Refer to Felts Step 1A.) STEP 4: Stamp over the top half of the surface. You will see that immediately the ink begins to flow over the sur- face. If it does not then put a bit more ink on your stamp. STEP 5: Keep stamping. The ink will continue to flow and mix until the area is lightly covered. (Refer to Inks Step 1.) STEP 6: Place some random dots of Raspberry on the same felt pad that has the Sailboat Blue. (Refer to Felts Step 2A.)
DECORATIVEPAINTERS.ORG
The Decorative Painter • SPRING 2017 77
