
Page 3 - How do I Create Customer Statements
P. 3
Creating Customer Statements
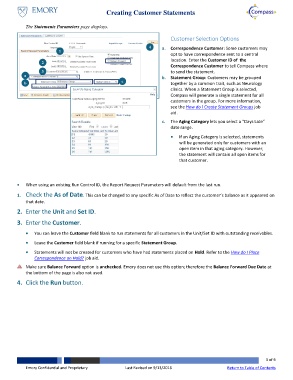
The Statements Parameters page displays.
Customer Selection Options
4
1 a. Correspondence Customer: Some customers may
opt to have correspondence sent to a central
2 location. Enter the Customer ID of the
Correspondence Customer to tell Compass where
3 to send the statement.
a b. Statement Group: Customers may be grouped
b c together by a common trait, such as Neurology
clinics. When a Statement Group is selected,
Compass will generate a single statement for all
customers in the group. For more information,
see the How do I Create Statement Groups job
aid.
c. The Aging Category lets you select a “Days Late”
date range.
If an Aging Category is selected, statements
will be generated only for customers with an
open item in that aging category. However,
the statement will contain all open items for
that customer.
When using an existing Run Control ID, the Report Request Parameters will default from the last run.
1. Check the As of Date. This can be changed to any specific As of Date to reflect the customer’s balance as it appeared on
that date.
2. Enter the Unit and Set ID.
3. Enter the Customer.
You can leave the Customer field blank to run statements for all customers in the Unit/Set ID with outstanding receivables.
Leave the Customer field blank if running for a specific Statement Group.
Statements will not be created for customers who have had statements placed on Hold. Refer to the How do I Place
Correspondence on Hold? job aid.
Make sure Balance Forward option is unchecked. Emory does not use this option; therefore the Balance Forward Due Date at
the bottom of the page is also not used.
4. Click the Run button.
3 of 6
Emory Confidential and Proprietary Last Revised on 9/13/2016 Return to Table of Contents