
Page 8 - April 2020_Neat
P. 8
8
April 2020 Return to Start
www.tswfl.org `Triumphs Live Page 8
On’
Tech Corner-continued
between the piston’s present position and the start of the intake stroke. Watching the valves in this manner, I
can be certain that the camshaft bump is down for the valve I’m going to adjust. Works every time, for every
engine, and I can adjust one cylinder at a time, without jumping around all over the place and having to work
math problems at the same time!
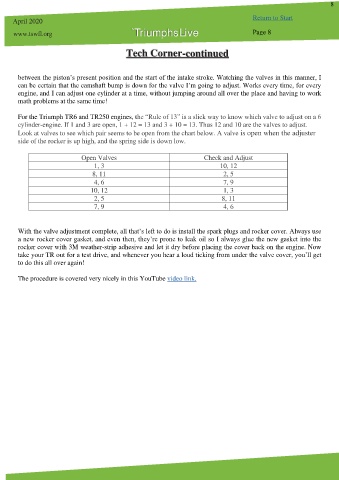
For the Triumph TR6 and TR250 engines, the “Rule of 13” is a slick way to know which valve to adjust on a 6
cylinder-engine. If 1 and 3 are open, 1 + 12 = 13 and 3 + 10 = 13. Thus 12 and 10 are the valves to adjust.
Look at valves to see which pair seems to be open from the chart below. A valve is open when the adjuster
side of the rocker is up high, and the spring side is down low.
Open Valves Check and Adjust
1, 3 10, 12
8, 11 2, 5
4, 6 7, 9
10, 12 1, 3
2, 5 8, 11
7, 9 4, 6
With the valve adjustment complete, all that’s left to do is install the spark plugs and rocker cover. Always use
a new rocker cover gasket, and even then, they’re prone to leak oil so I always glue the new gasket into the
rocker cover with 3M weather-strip adhesive and let it dry before placing the cover back on the engine. Now
take your TR out for a test drive, and whenever you hear a loud ticking from under the valve cover, you’ll get
to do this all over again!
The procedure is covered very nicely in this YouTube video link.