
Page 3 - Step and repeat document 1
P. 3
Ecrãns daApp # Activating your Robotic Cleaner 24320_eyal - 24320_eyal | 1 - B | 18-02-19 | 10:13:43 | SR:-- | Cyan 24320_eyal - 24320_eyal | 1 - B | 18-02-19 | 10:13:43 | SR:-- | Magenta 24320_eyal - 24320_eyal | 1 - B | 18-02-19 | 10:13:43 | SR:-- | Black #24320_eyal - 24320_eyal | 1 - B | 18-02-19 | 10:13:43 | SR:-- | Yellow
Informação a b
1
Mostra informação sobre o seu
robot de limpeza.
Puxe para baixo para Aquacontrol
atualização das leituras 3
Connected Check filter
Connecté Vérifiez le filtre
Conectado Revise el filtro
2 Verbunden Filter uberprufen
Collegato Controllare il filtro
Conectado Verifique o filtro
4
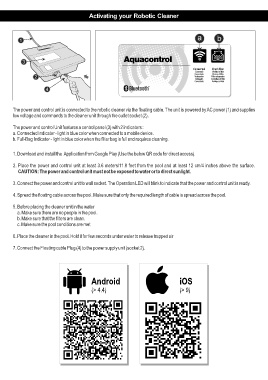
The power and control unit is connected to the robotic cleaner via the floating cable. The unit is powered by AC power (1) and supplies
low voltage and commands to the cleaner unit through the outlet socket (2).
Main Screen Controlo Remoto
Mantenha pressionado os The power and control Unit features a control panel (3) with 2 indicators :
ícones DIREITA ou ESQUERDA a. Connected Indicator - light in blue color when connected to a mobile device.
para virar o robô. b. Full-Bag Indicator - light in blue color when the filter bag is full and requires cleaning.
Use um único toque no ícone
central CHANGE-DIRECTION 1. Download and install the Application from Google Play (Use the below QR code for direct access).
para mudar o sentido de direção
do robot. 2. Place the power and control unit at least 3.6 meters/11.8 feet from the pool and at least 12 cm/4 inches above the surface.
CAUTION: The power and control unit must not be exposed to water or to direct sunlight.
3. Connect the power and control unit to wall socket. The Operation LED will blink to indicate that the power and control unit is ready.
Alertas
4. Spread the floating cable across the pool. Make sure that only the required length of cable is spread across the pool.
Mostra os diferentes alertas
oriundosdo robot de limpeza ou 5. Before placing the cleaner unit in the water
da unidade de alimentação e a. Make sure there are no people in the pool.
controle. b. Make sure that the filters are clean.
c. Make sure the pool conditions are met
Para saber qual a acção
necessária para cada alerta - 6. Place the cleaner in the pool. Hold it for few seconds under water to release trapped air
consultar a secção Trouble
Shooting. 7. Connect the Floating cable Plug (4) to the power supply unit (socket 2).
Definições
Altere as configurações do seu Robot de limpeza:
1. Delay Start (em horas): O Robot inicia o ciclo de limpeza após o período de tempo Android iOS
escolhido. Utilize esta opção para permitir que a sujeira se afunde antes de iniciar o (> 4.4) (> 9)
ciclo de limpeza.
2. Tempo de Operação: O Robotic Cleaner limpa a piscina de acordo com o tempo
de ciclo escolhido.
3. Intervalo de trabalho: O limpador robótico começará a trabalhar automaticamente
a cada 48/72/96 horas. (Escolhendo esta opção irá cancelar o tempo de atraso)
4. Gyro Correction Level: Escolha HIGH se o robô não estiver dirigindo em linha reta
ou se o cabo estiver emaranhado
5. Características da Piscina: Escolha a Forma e a Superfície de acordo com as
características da sua piscina.
6. Idioma: Escolha o idioma de interface preferido.