
Page 3 - Corotile
P. 3
1
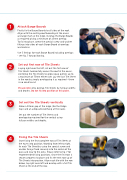
Attach Barge Boards
Firstly fix the Barge Boards to all sides of the roof. Align with the existing roof boarding at the eaves and align flush at the ridge. Overlap the Barge Boards as required giving a minimum of 25mm overlap.
To fix into place, screw the special screw and washer fittings into sides of each Barge Board at overlaps and centres.
Use 3 fittings for each Barge Board including overlaps - see fig. 7 for positioning.
Set out first row of Tile Sheets
Laying right over the left, set out the first row of
Tile Sheets horizontally across the roof at the eaves, centering the Tile Sheets to allow equal gutters up to
a maximum of 75mm either side. Lay the last Tile Sheet in the row by simply overlapping it as required - there is no need to cut.
Please note: only overlap Tile Sheets by full pan widths and depths. Do not fix into position at this point.
2
3
Set out the Tile Sheets vertically
Allow a 50mm gap at the ridge (for the Ridge Cap) and an adequate overhang at the eaves.
Set out the number of Tile Sheets and overlapping required for the vertical using full pan widths and depths.
Fixing the Tile Sheets
Start fixing the first complete row of Tile Sheets at the eaves into position. Working from left to right, fix each Tile Sheet by using the special screw and washer fixings fixed securely into the centre of the pans and near to the joins. Please refer to fig. 7 for recommended fixing positions. Once the first row is secure, progress to place and fix the next row up of Tile Sheets into postion. Align each tile with the row below, lay right over left and overlap with a full Tile Sheet at the end of the row.
4
