
Page 4 - Corotile
P. 4
5
Attach Ridge End Caps
Once all the Tile Sheets have been fixed securely into position, you are now ready to attach the Ridge End Caps and Ridge. Place Ridge End Caps into position centering on the apex of the roof and fix a screw and washer fixing into the centre as shown. Bend over both of the ears in order to underlap the Ridge Cap when fitted.
Attach the Ridge Cap
Put the first Ridge Cap into place flush with the end of the Barge Board and Ridge End Cap. Fix using the screw and washer fixings attached securely into the Barge Boards at the end, and then along the length down into the flange of the Tile Sheet underneath. Overlap the next Ridge Cap and fix a screw and washer fixing through both sections.
6
Repeat along the length of the ridge using a full Ridge Cap at the other end.
See fig. 7 for fixing positions.
7
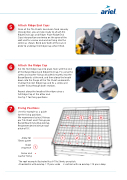
Fixing Positions
Use this example as a guide for the fixing positions.
We recommend using 9 fixings per Tile Sheet and 3 fixings per Barge Board including overlap. Recommended minimum roof pitch of 10°.
Allow for 75mm gutter
Sheet sequence
Screw and washer fixing
4568
1237
1
The roof example illustrated has 8 Tile Sheets per pitch:
4 horizontal with overlap = 17 pans wide 2 vertical with no overlap = 14 pans deep
