
Page 11 - PBL883 ABB Brochure 3KXA843403R4201 OPERATING INSTRUCTIONS (OI/ACL410-EN) (16PP Q4 STITCH)
P. 11
ACL410 | CHLORINE SENSOR | OI/ACL410-EN PILOT BUILD 11
6 Maintenance Periodic functional check
1 Check the measuring cell once a week to maintain the best measurement accuracy. Calirate as required.
Cleaning/Replacing the electrodes
If sensitivity of the cell decreased too much, it is possible that the copper electrode is damaged. To replace the electrodes:
1 Remove both signal leads at the cell.
2 Pull the gold electrode fitting in the cell down to expose the
entire electrode chamber.
12 Clean the electrode with a non-chlorinated cleanser or a mild abrasive such as a Scotch-BriteTM pad.
13 Install the copper electrode.
14 Install the gold electrode.
15 Add the correct amount of corundum sand (refer to "Sensor setup - First time installation" on page 7).
16 Start the sample flow.
17 Check that the sealing surfaces and mating parts are free
from sand.
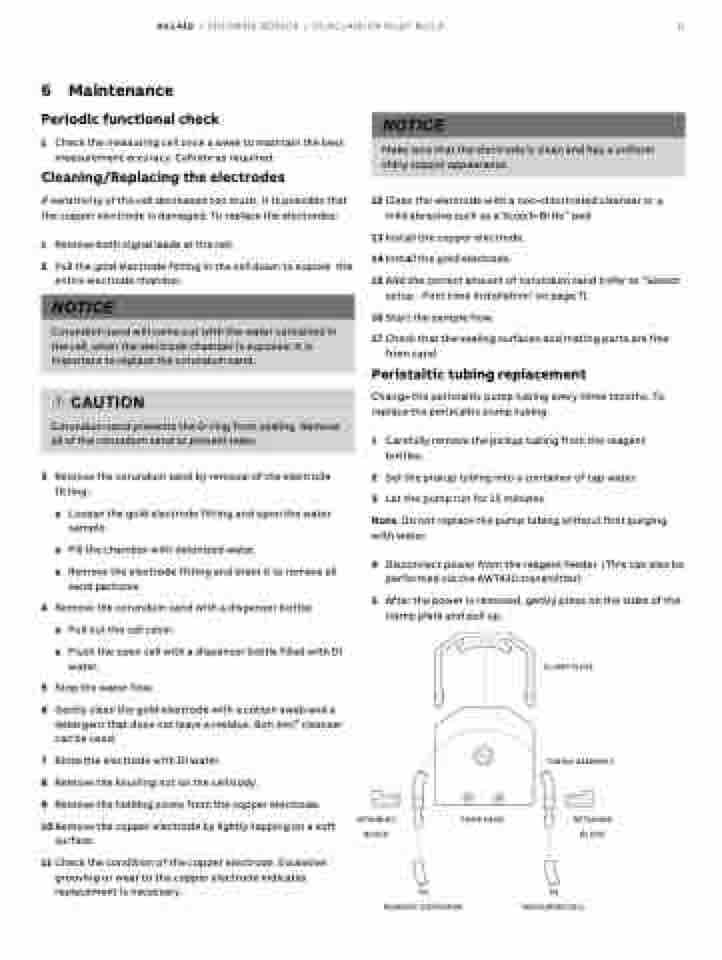
Peristaltic tubing replacement
Change the peristaltic pump tubing every three months. To replace the peristaltic pump tubing:
1 Carefully remove the pickup tubing from the reagent bottles.
2 Set the pickup tubing into a container of tap water. 3 Let the pump run for 15 minutes.
Note . Do not replace the pump tubing without first purging with water.
NOTICE
Make sure that the electrode is clean and has a uniform shiny copper appearance.
NOTICE
Corundum sand will come out with the water contained in the cell, when the electrode chamber is exposed. It is important to replace the corundum sand.
CAUTION
Corundum sand prevents the O-ring from sealing. Remove all of the corundum sand to prevent leaks.
3 Remove the corundum sand by removal of the electrode fitting:
a Loosen the gold electrode fitting and open the water sample.
a Fill the chamber with deionized water.
a Remove the electrode fitting and drain it to remove all
sand particles.
4 Remove the corundum sand with a dispenser bottle:
a Pull out the cell cover.
a Flush the open cell with a dispenser bottle filled with DI
water.
5 Stop the water flow.
6 Gently clean the gold electrode with a cotton swab and a detergent that does not leave a residue. Bon Ami® cleanser can be used.
7 Rinse the electrode with DI water.
8 Remove the knurling nut on the cell body.
9 Remove the holding screw from the copper electrode.
10 Remove the copper electrode by lightly tapping on a soft surface.
11 Check the condition of the copper electrode. Excessive grooving or wear to the copper electrode indicates replacement is necessary.
4 5
Disconnect power from the reagent feeder. (This can also be performed via the AWT420 transmitter)
After the power is removed, gently press on the sides of the clamp plate and pull up.
CLAMP PLATE
TUBING ASSEMBLY
RETAINING BLOCK
TO MEASURING CELL
RETAINING BLOCK
PUMP HEAD
TO REAGENT CONTAINER
